JetPopup
JetPopup Opening Events
From this block, you can learn more about setting the specific popup template for the page, specifying the popup trigger events and adding the popups to the widgets or widget parts.
Opening Conditions
From this block, you can learn more about the opening conditions that can be applied for the popup template.
- In order to access the popup template's opening conditions and manage them, please, navigate to the list of popup templates. Hover at one of the templated and click Edit with Elementor option.
- When the editor opens, locate Settings option in the bottom left corner of the editor. Click it to access the JetPopup Settings.
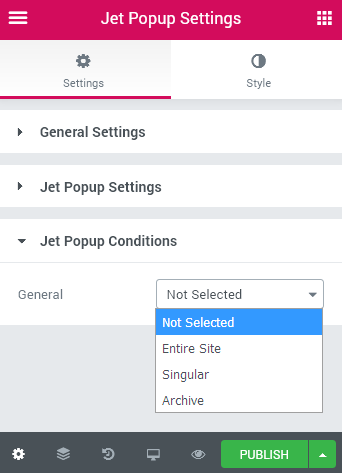
- Open JetPopup Conditions section to view the list of available conditions.
Here is the list of conditions that can be set for the popup template:
- Entire Site - use this condition to set the popup for the whole site. The popup will open on any website's page.
- Singular - use this option in order to set the popup for the specific page or template. After the option is selected you'll be able to select the page or page template from the dropdown below. In case you've specified Post or Page, you'll have to enter its title in the text field below.
- Archive - select this option to set the popup for one of the Archive pages (e.g., Posts archive on Blog page, or Products Archive, etc.). You can set the popup to be shown for Post Type Archives (like Posts, Products or any other ones), for Tag and Category Archives (you'll have to specify the tag or category to set the popup only for them, or leave the field blank to show the popup for every category or tag archive).
- Available for Roles - here you can select who will be able to see the popup. There are such options as Administrator, Author, Contributor, Subscriber, Customer and Shop Manager.
- After that click Update button to save the changes. Now you've set the opening conditions for the popup template.
Trigger Events
From this block, you can learn more about setting the trigger events for the popup templates.
- First, open the popup template for editing. Here navigate to Settings > Popup Settings block located in the bottom left corner. Here select Settings tab in the left sidebar of the editor.
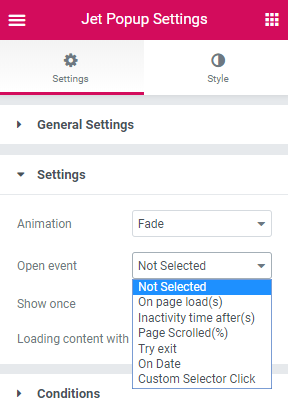
- In Open Event select the most suitable event for the popup to appear:
- on page load(s) - specify this trigger even to make the popup be displayed when the visitor opens the new page. When this trigger is selected you can also set the Open Delay value to let the popup show up when the page is loaded and the visitor already has started viewing the content.
- inactivity time after(s) - let the popup template be displayed after the visitor has been inactive on the page for a while. When this option is selected you'll be able to set the inactivity time after which the popup window should appear in User inactivity time block.
- page scrolled (%) - apply this trigger event in case you want the popup window appear when the visitor scrolls the page to certain percent.
- try exit - select this trigger to show the popup window when the visitor intents to exit the page.
- on date - you can specify the date and time to start showing the popup, e.g., to showcase the offer or the congratulation, or display the reminder for the visitor. To set the date and time fill in the needed values in the Open Date field.
- custom selector click - choose this Open event to specify the selector, that will trigger the popup when one clicks it.
- Enable Show once option to display the current popup template only once and never show it again in case it was already displayed to the visitor.
- Enable Loading content with Ajax option to delay loading of the popup content. The content is being loading by opening a popup.
Attached Popups
From this block, you can learn more about the specifics of adding the popup templates as the attachments for the Elementor widgets.
- To attach a popup template to the widget or one of its parts you can easily use JetPopup block available in the Advanced settings for every widget.
- To access the Attached Popup functionality open the page where you plan on adding the new popup and here select one of the widgets which will become the trigger for the popup. Click Edit Widget to access the widget's content, style and advanced settings.
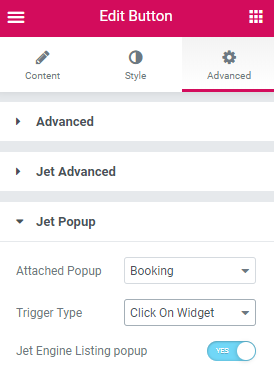
- Switch to Advanced settings and here open JetPopup block. Select the popup template you want to attach to the widget in the Attached Popup dropdown.
You can select what will be the trigger for the popup in the Trigger Type dropdown. There are several trigger types available:
- Click On Button - select this option in order to make the popup window appear when you click the button in the specific widget (e.g., the button in the Animated Box's back side, etc).
- Click On Widget - here it is available to set the popup appears when you click on the specific widget.
- Click On Custom Selector - here you can enable the popup window when the visitor clicks on the specific element on your site that has the specified CSS selector. After you've selected this option you'll have to input the selector (e.g., .my-selector) in the corresponding field to attach the popup to it.
Please, note, that in case you've decided to use Click Selector trigger type, you'll have to input the selector from the widget to which you're adding the popup on click.
Hit F12 button to inspect the page and copy the selector inside the widget, which you're planning to use. Then paste the selector in the Custom Selector field (e.g., .element-icon). Make sure you've added a dot before the selector name to mark it as a selector.
- Hover - when you choose this option the popup will appear whenever the visitor hovers to the widget.
- Scroll to Widget - the popup will appear when one scrolls the page to the place where the widget is located.
Enable the JetEngine Listing popup option ir order to show the listing created with JetEngine in the popup.