
Vendy Pro
"How to..." Shopify Customization Issues
Here we have gathered the most frequently asked questions about Vendy theme customization and management.
How to edit Powered By Shopify link?
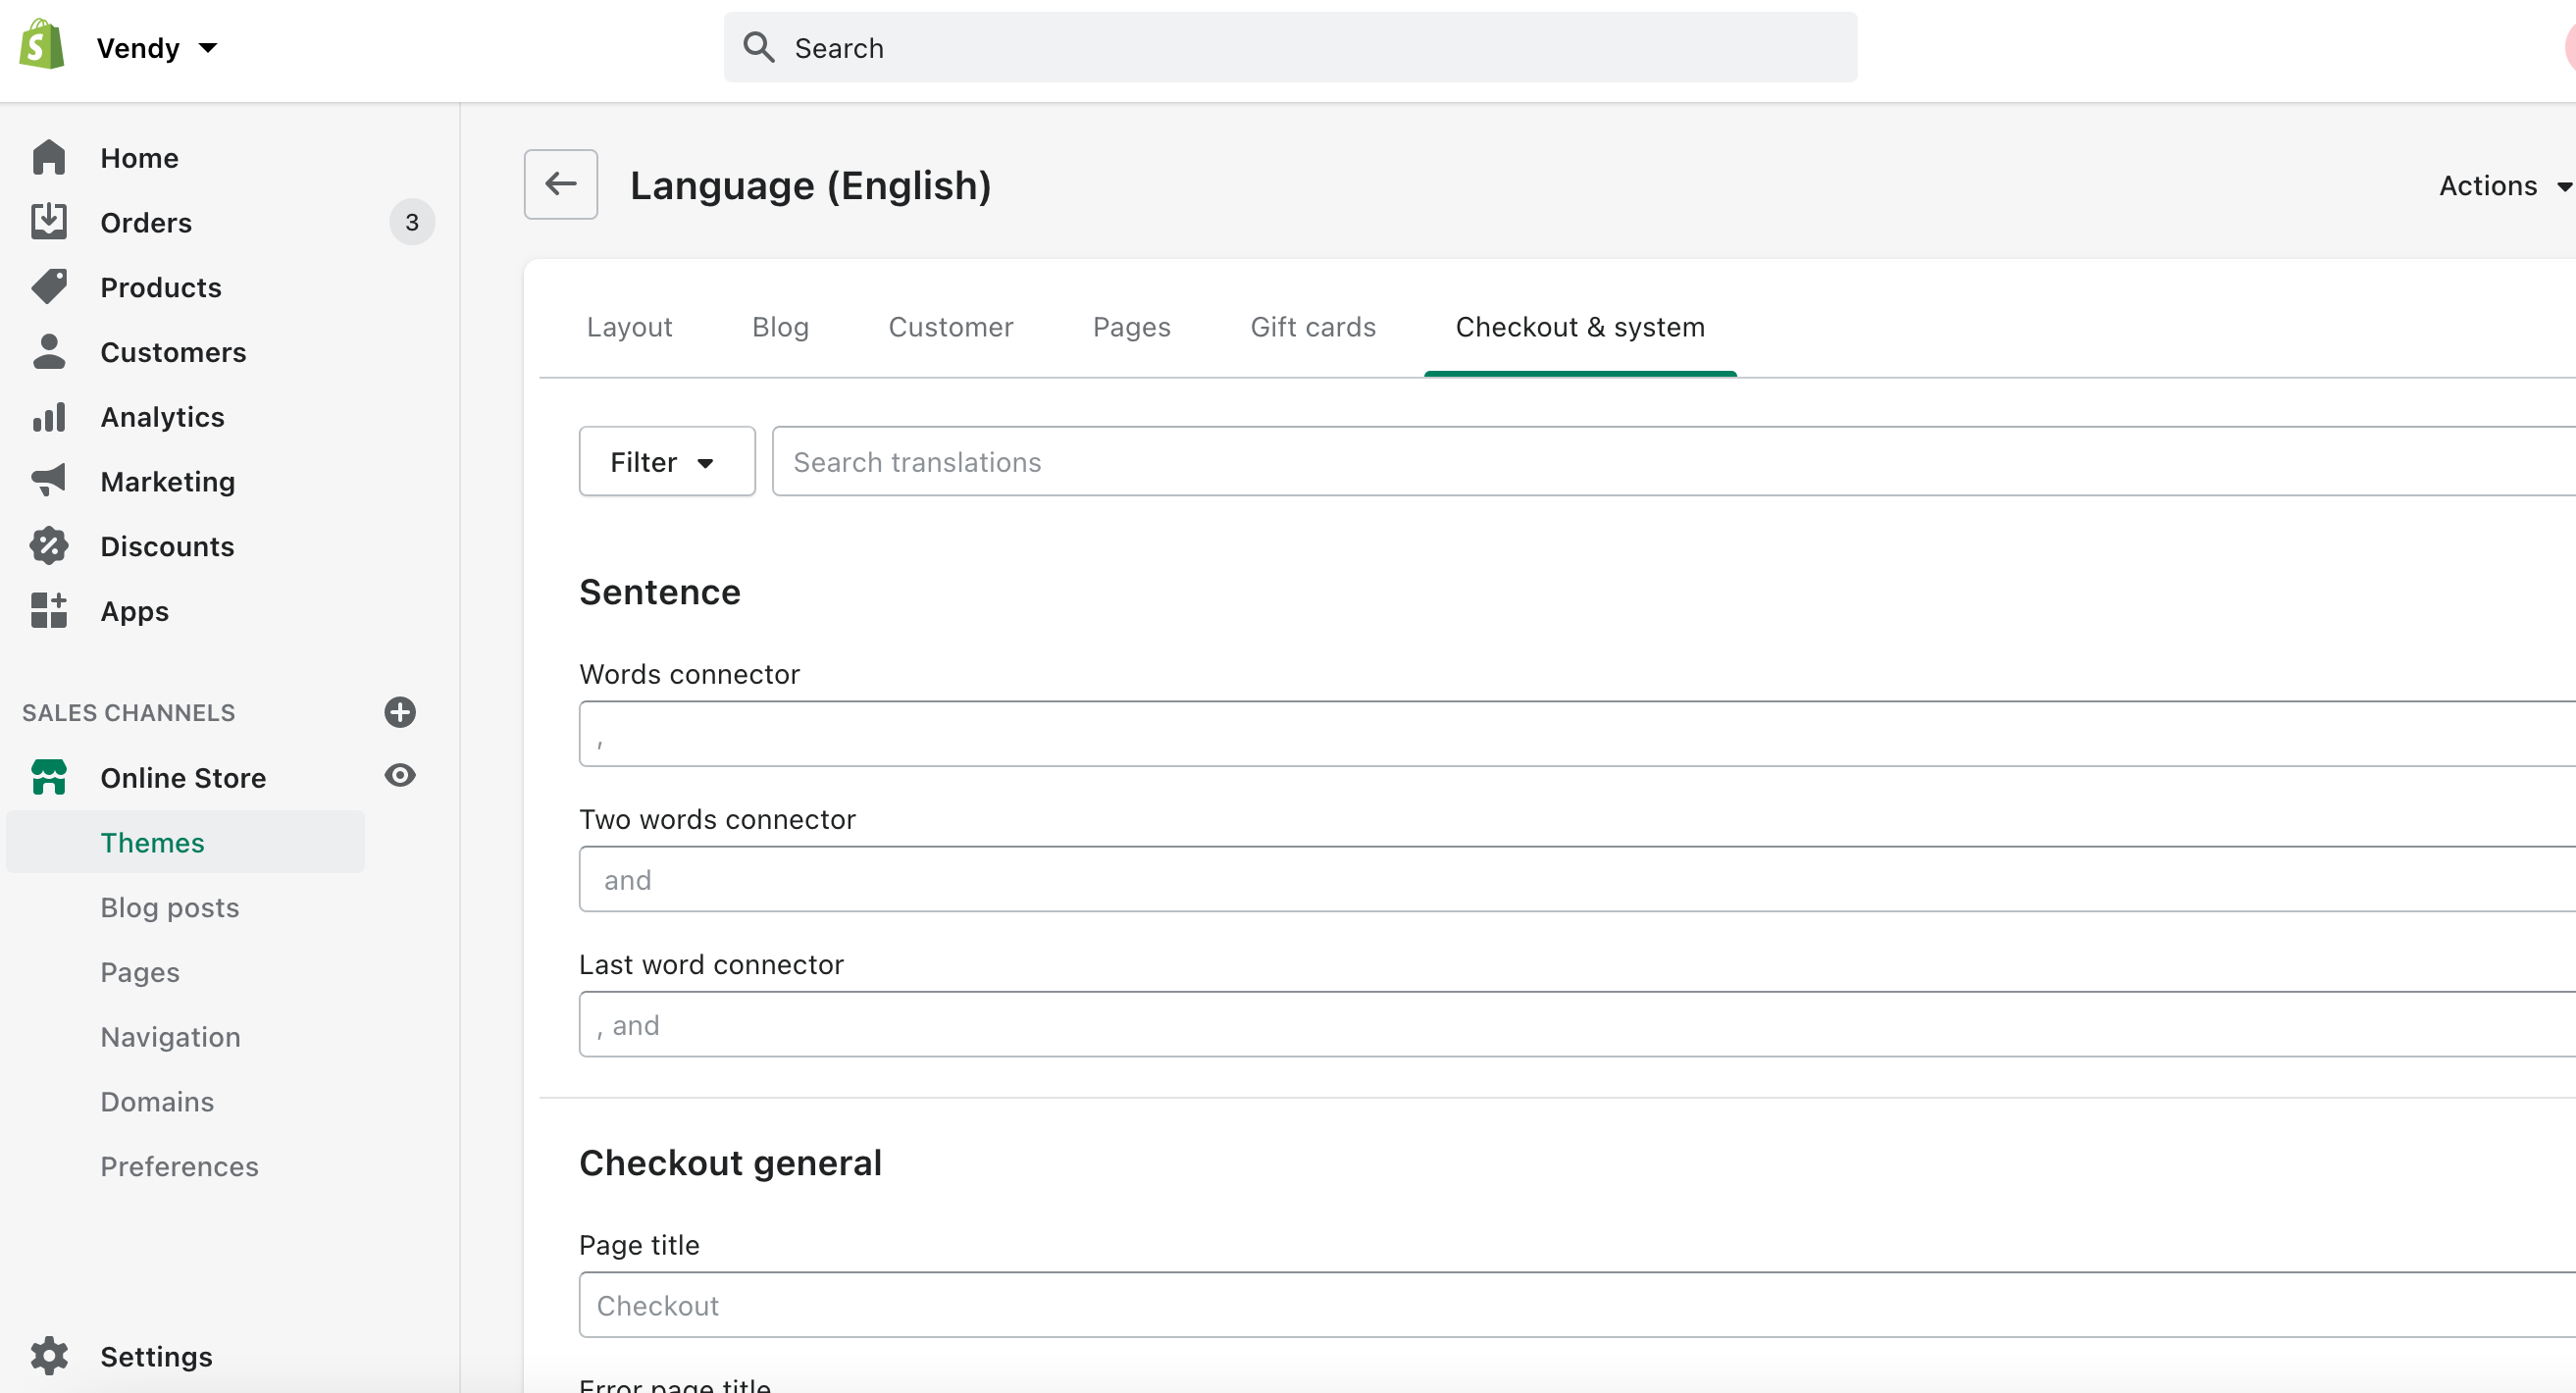
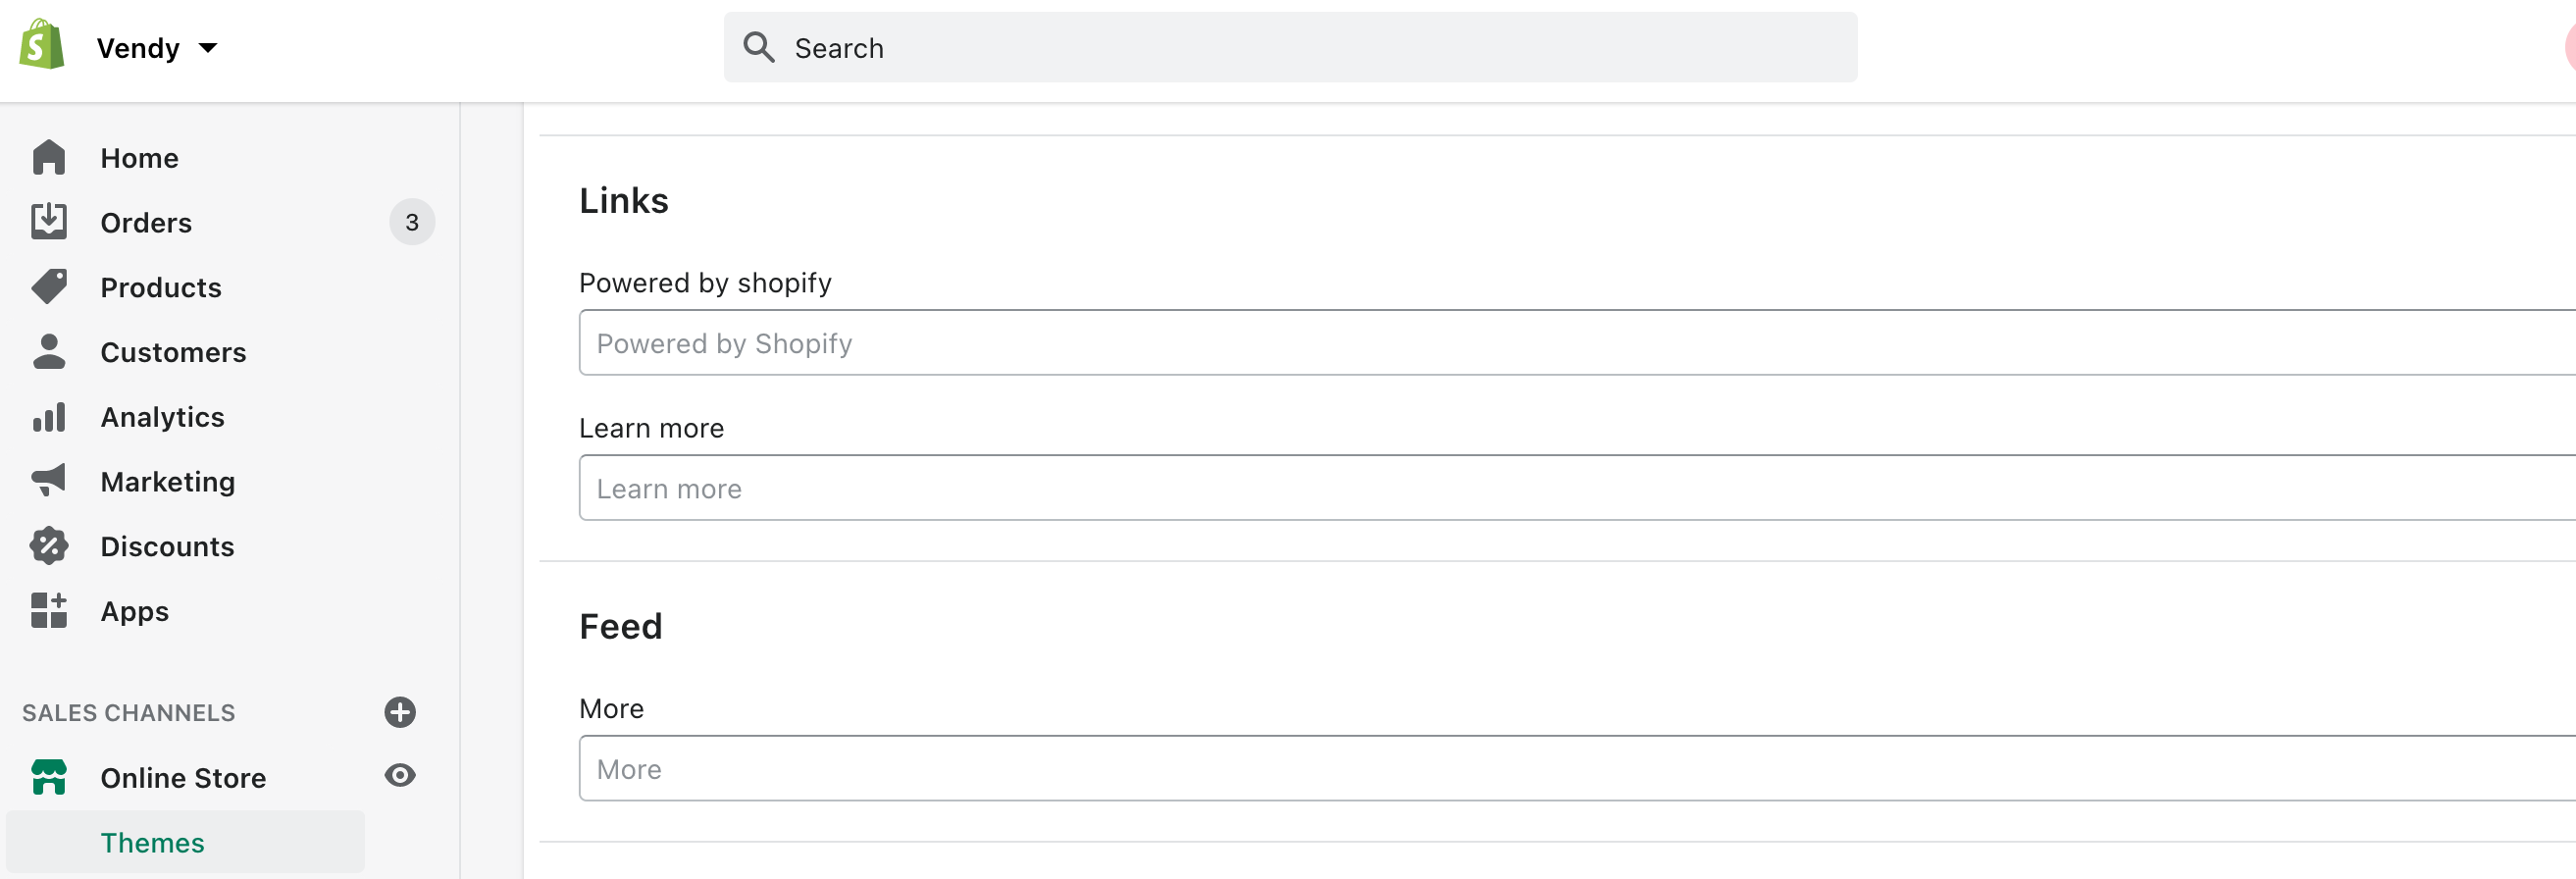
The copyright message can be changed in Online Store > Themes > Actions > Edit Languages.
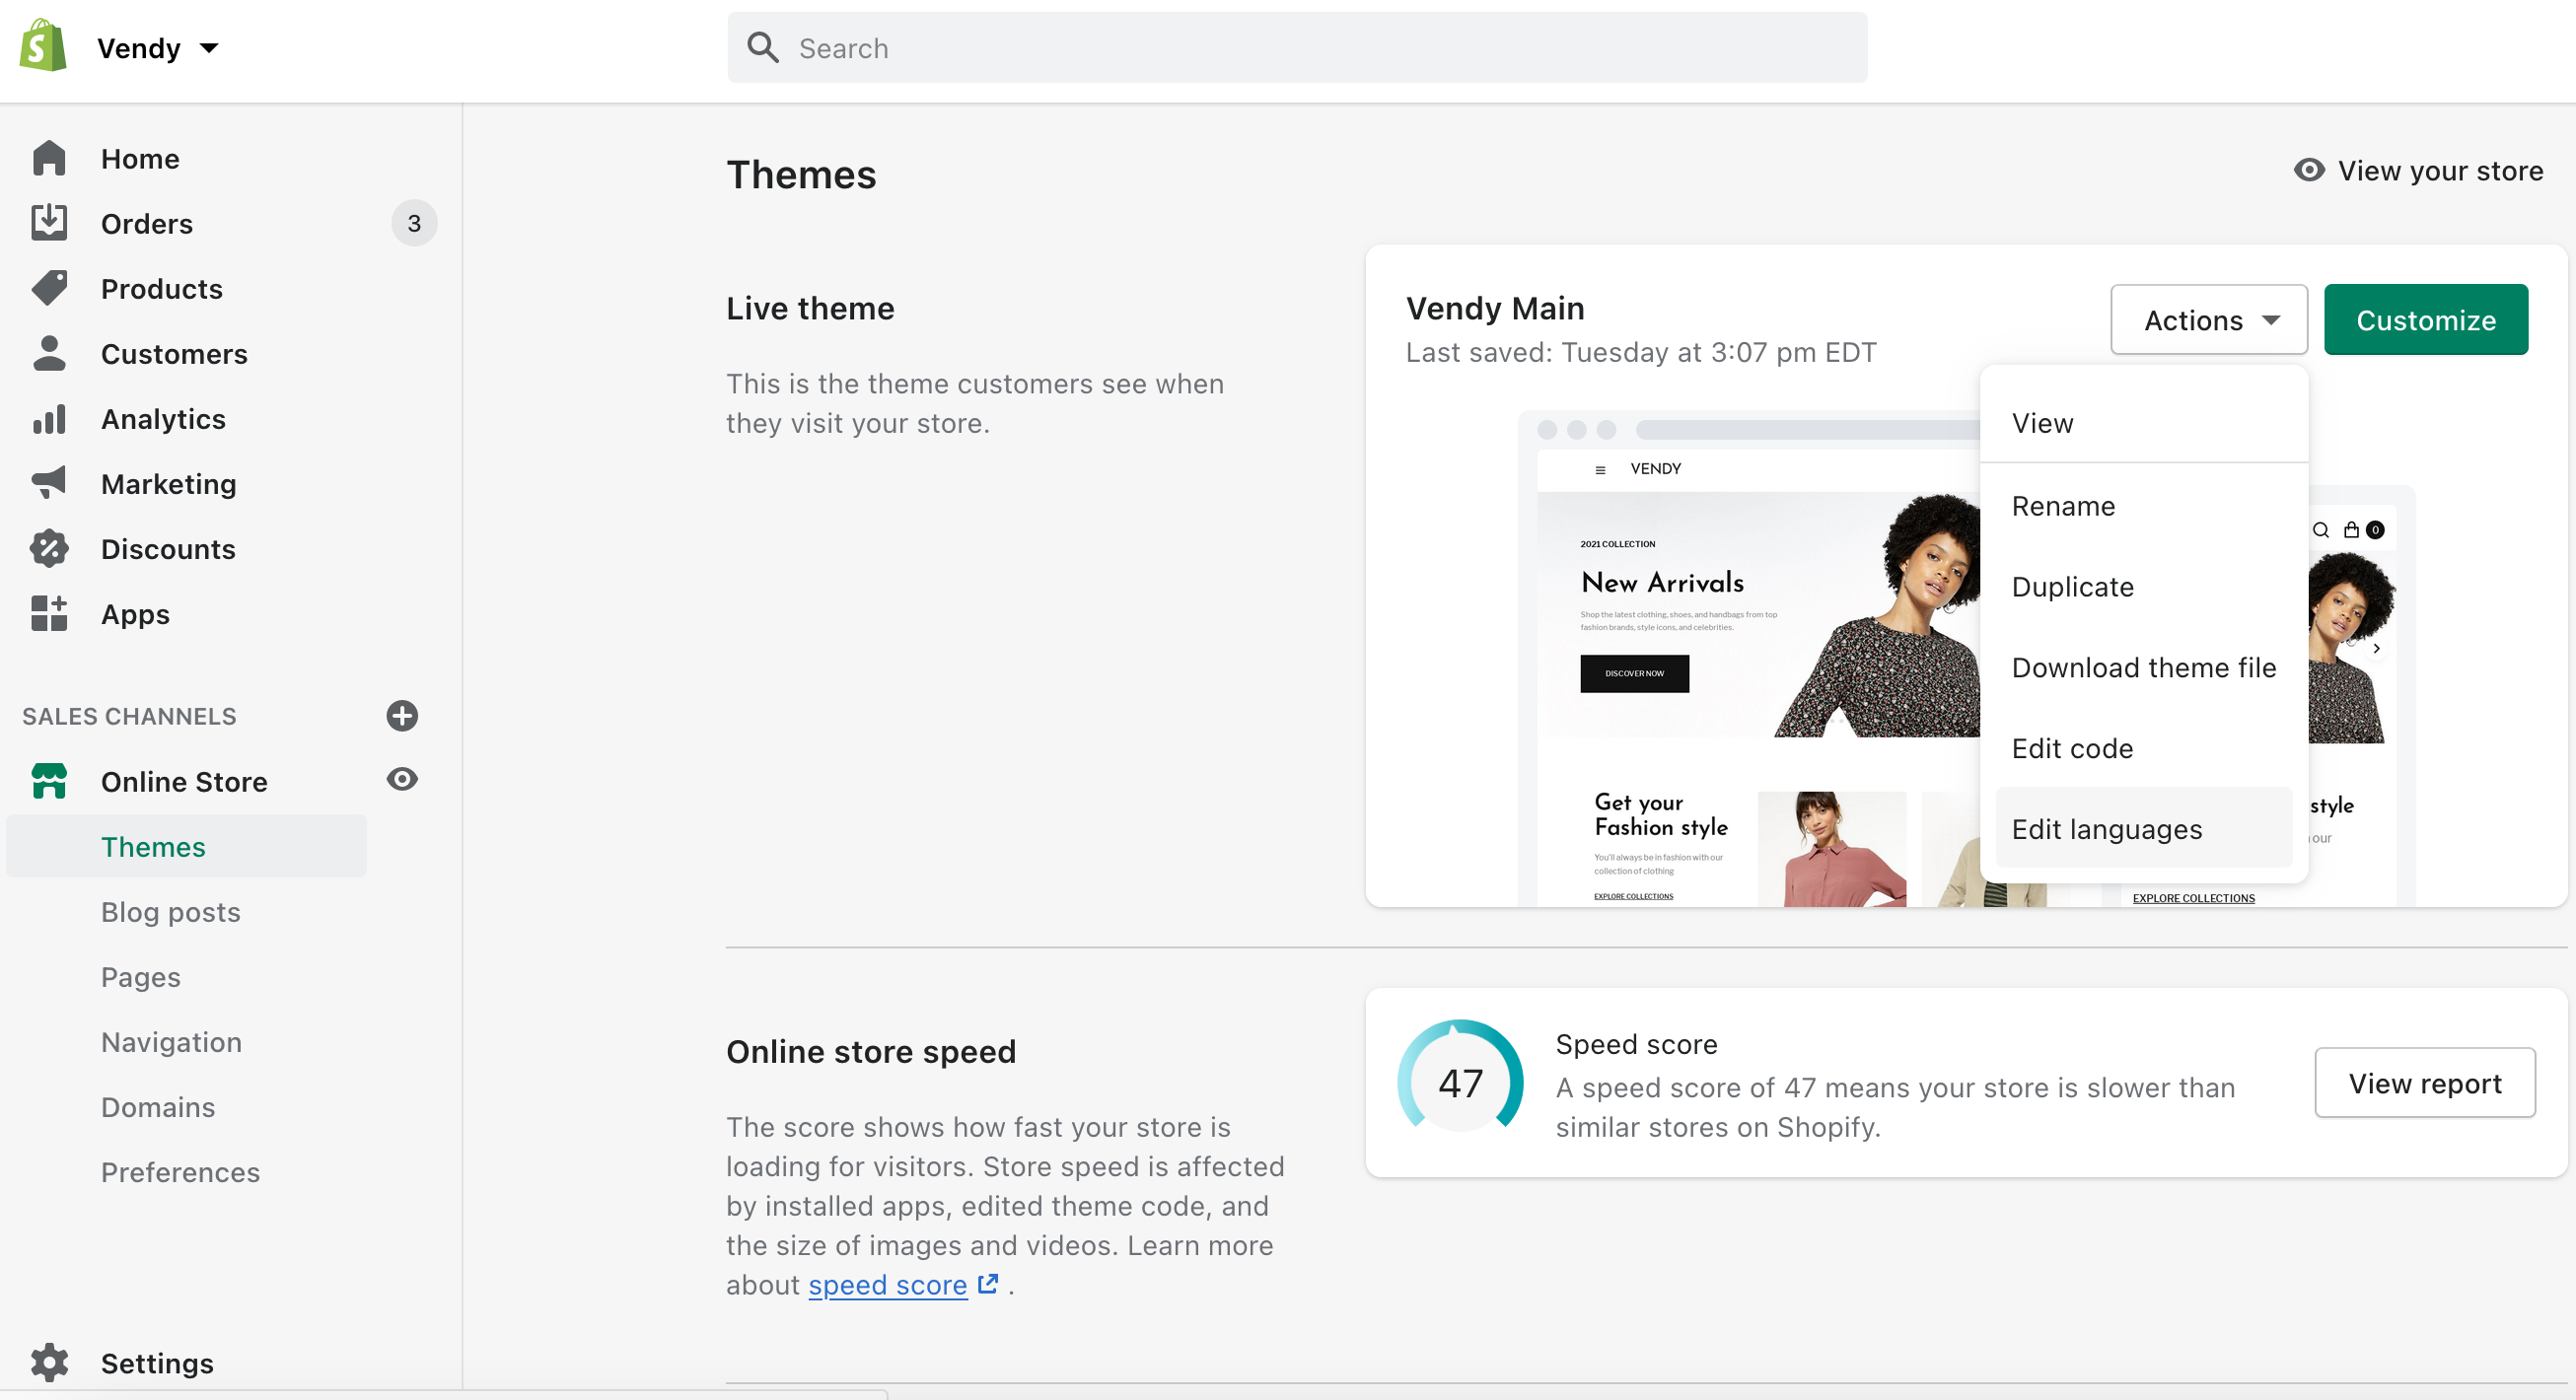
Then choose Checkout & system.
Scroll down to the Links section.
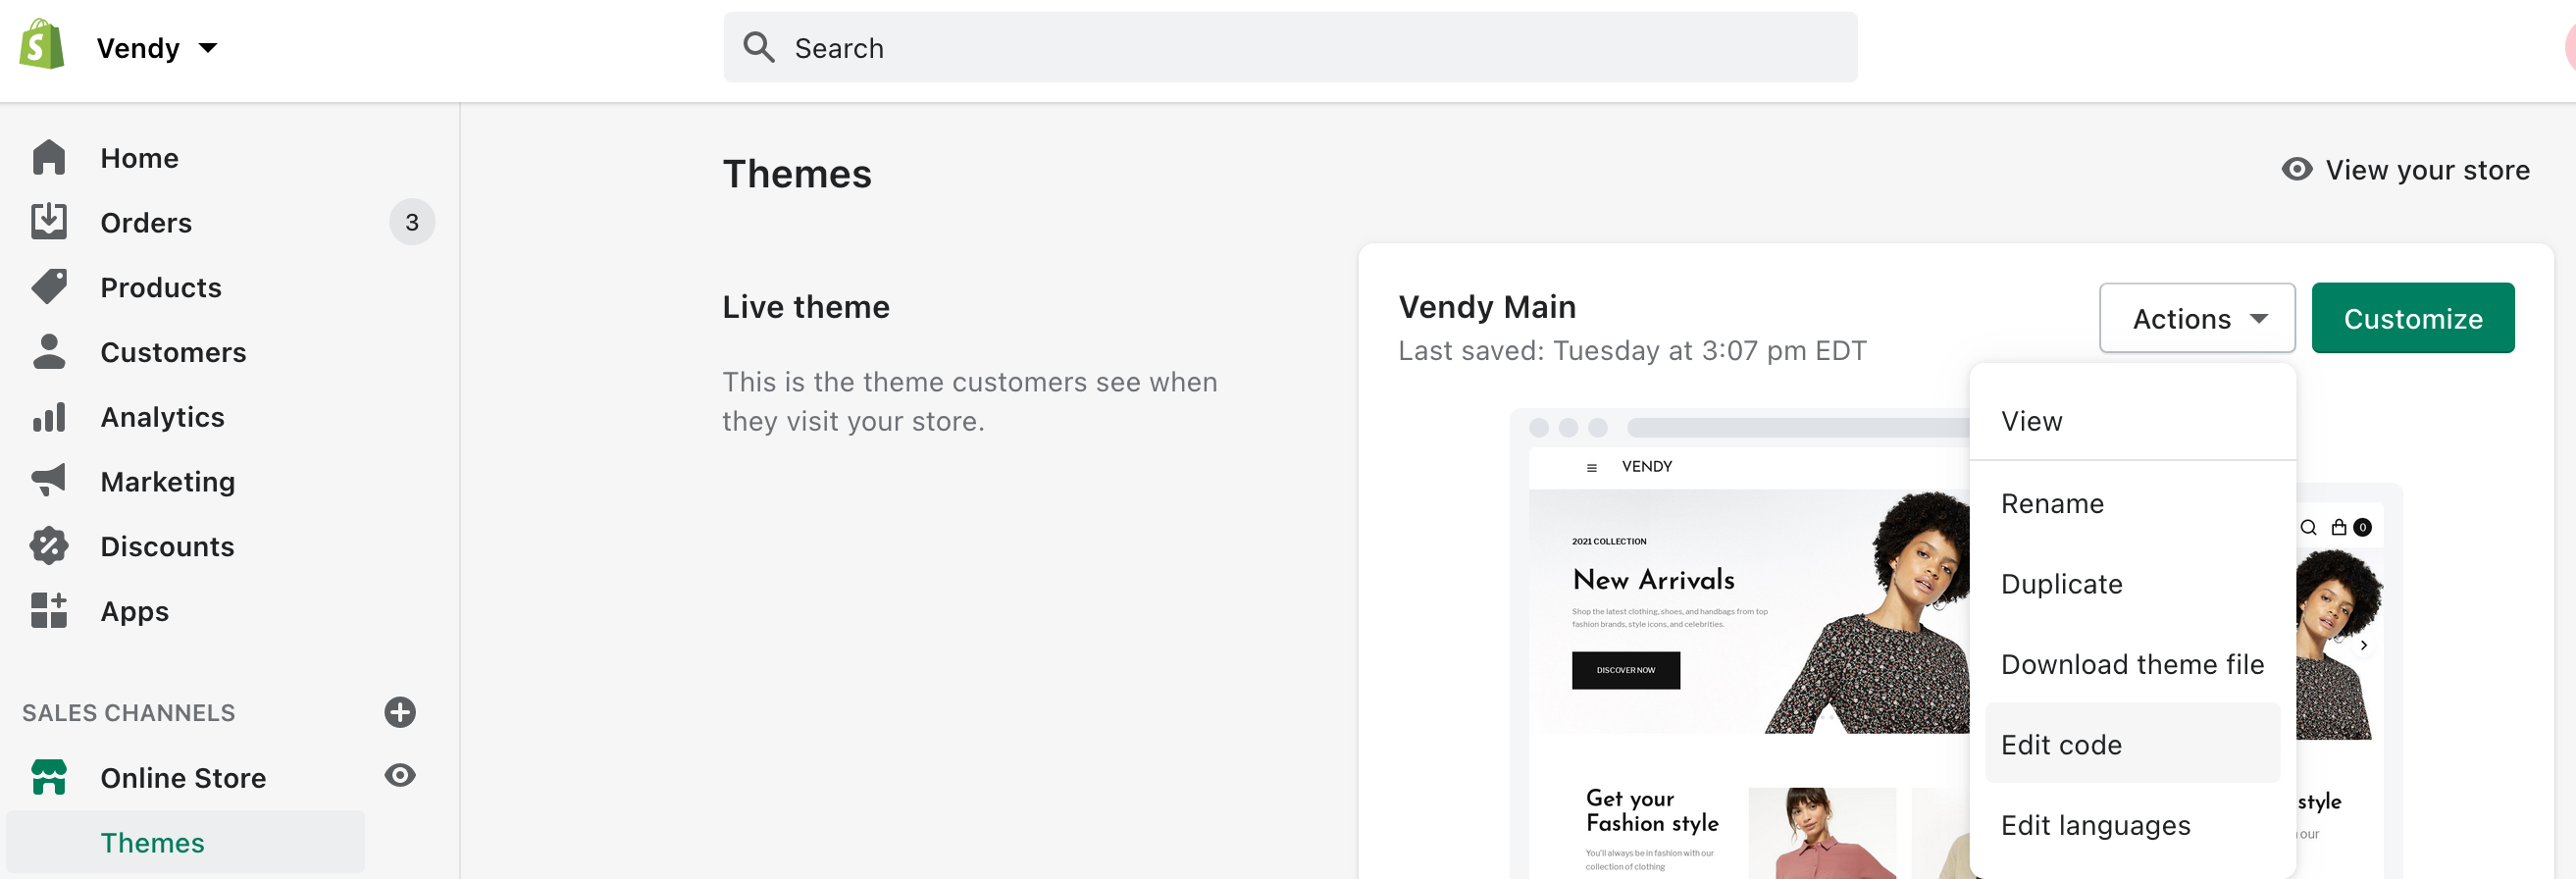
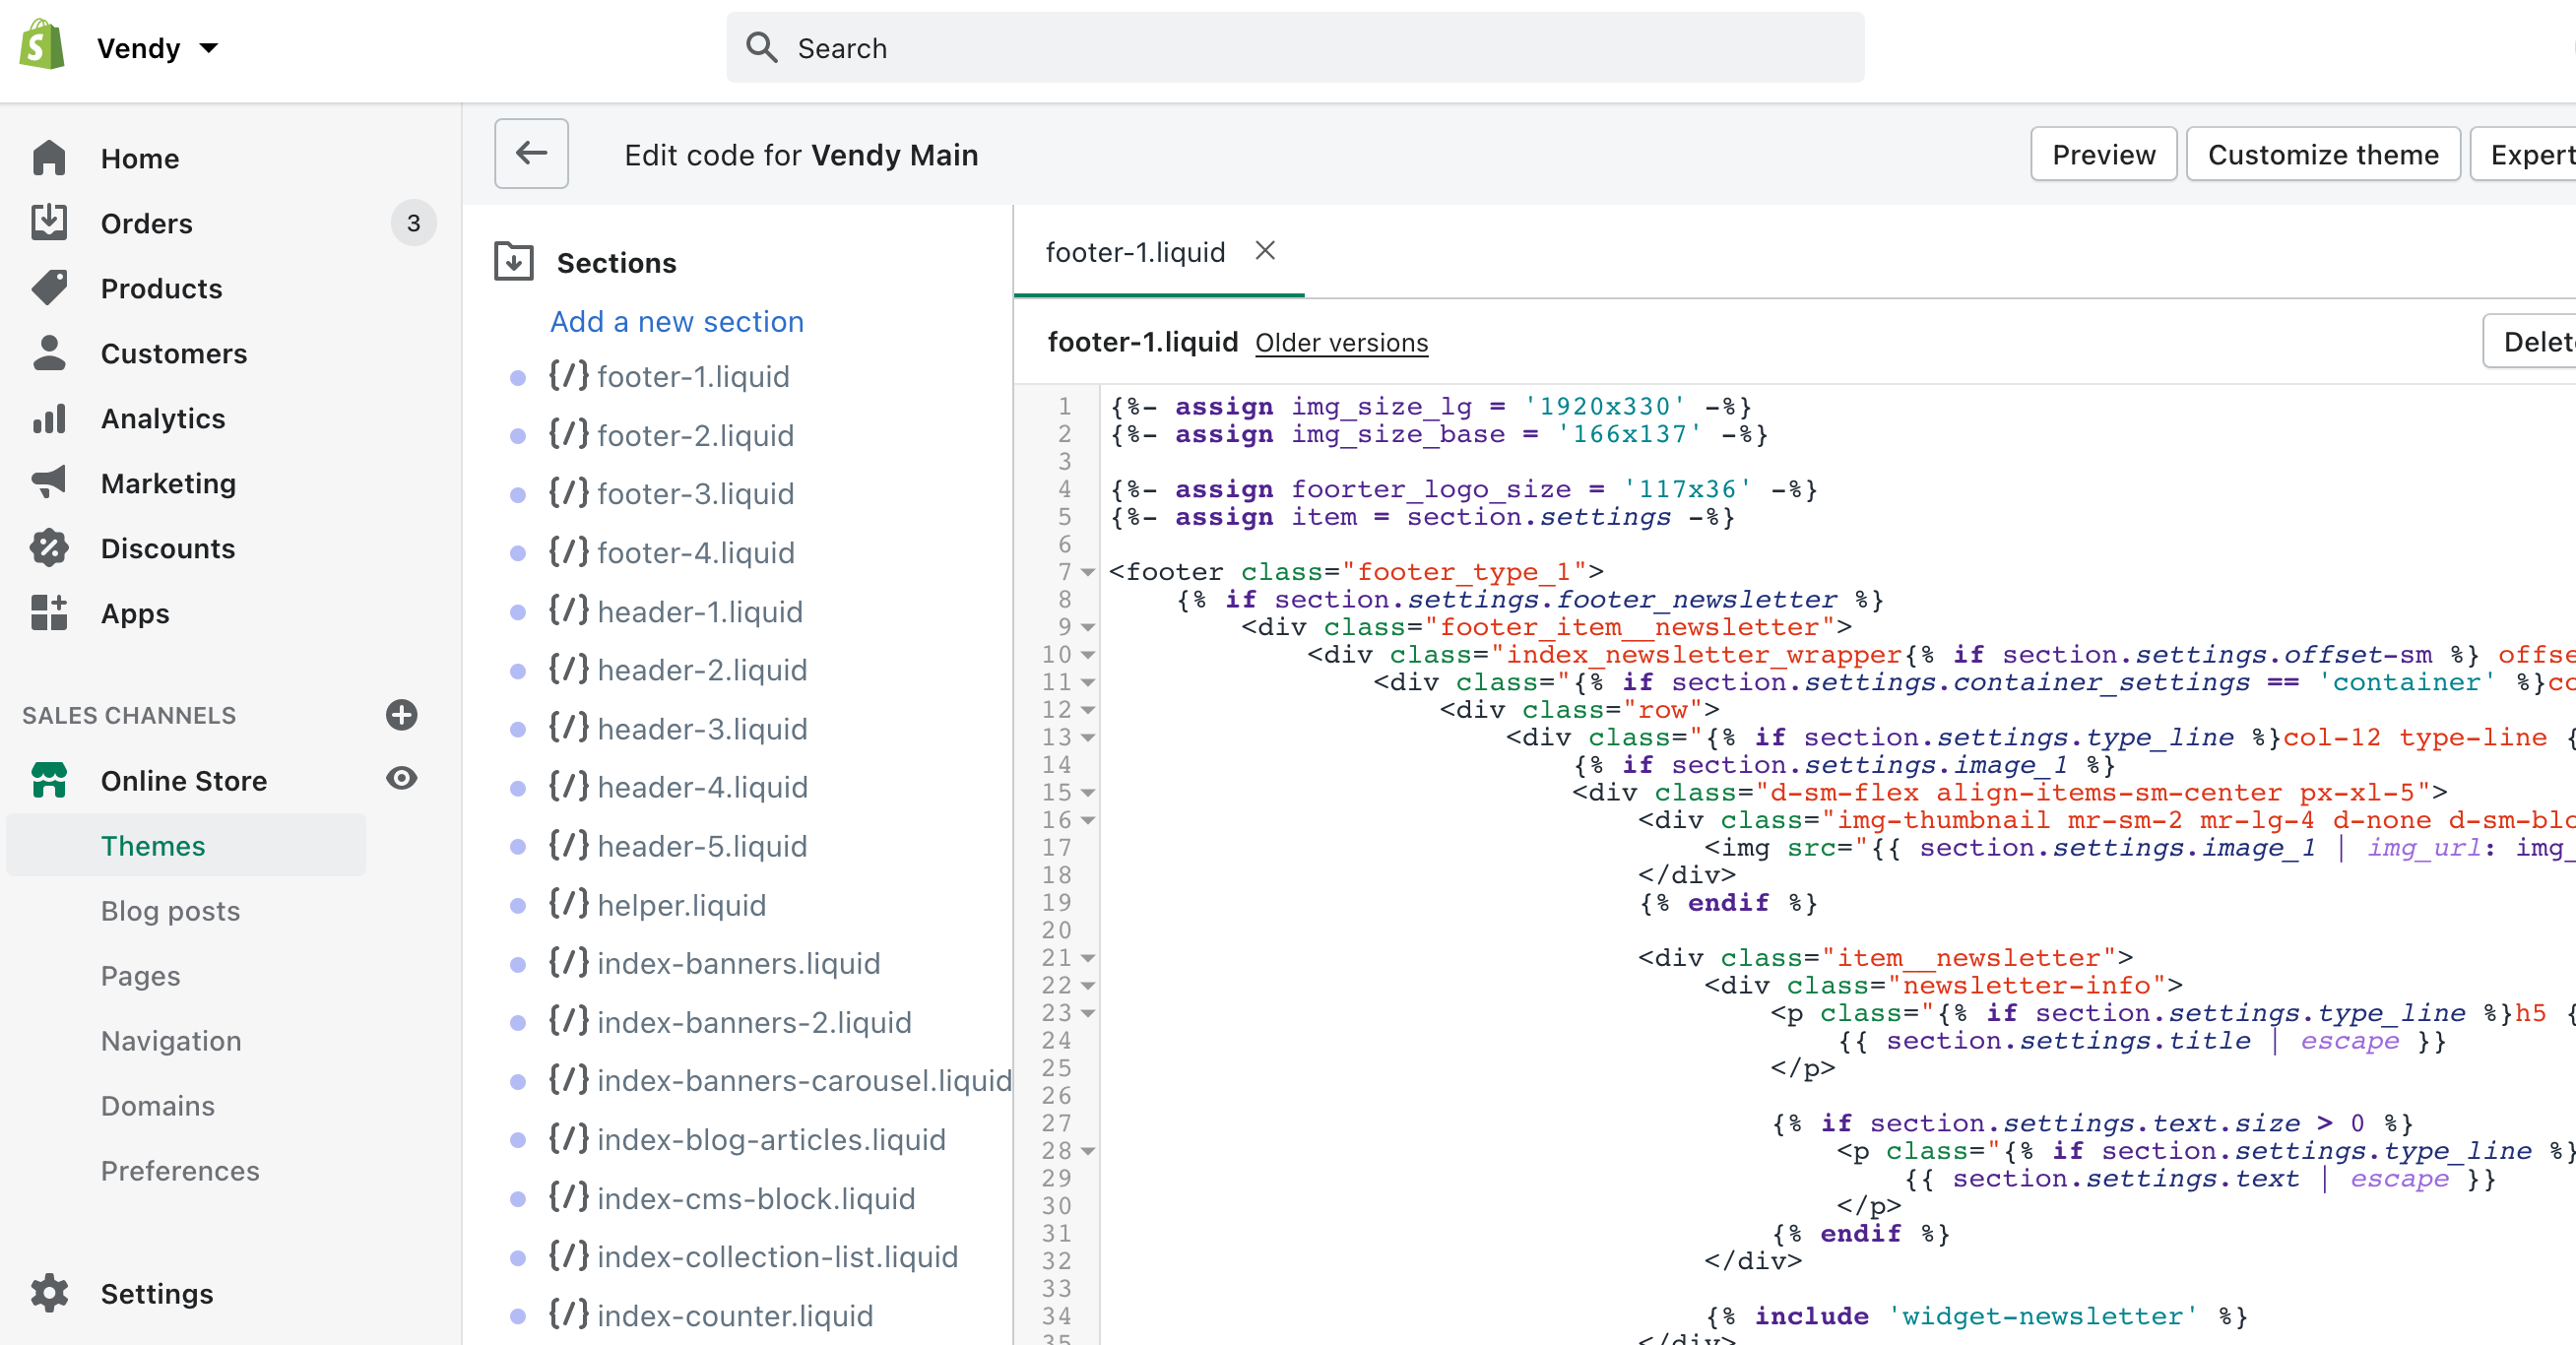
The copywrite coding is located in the Online Store > Themes > Actions > Edit code.
Scroll down to the Sections and edit footer-1.liquid / footer-2.liquid / footer-3.liquid depending on the footer type you use on the site.
How to manage the Product Image Size?
The size of product images on collection pages can be adjusted in Online Store -> Themes -> Edit code -> Sections -> template-collection.liquid:

The size of product images on Product Pages can be adjusted in Online Store -> Themes -> Edit code -> Sections -> template-product.liquid in the product_img_url area.
The size of product images on Home Page Sections can be adjusted in Online Store -> Themes -> Edit code -> Sections select the needed section name in the product_img_url area.
Make sure to upload all the images of the same size per selected product dimensions for the nice layout.
How to manage a Delivery policy on the product page?
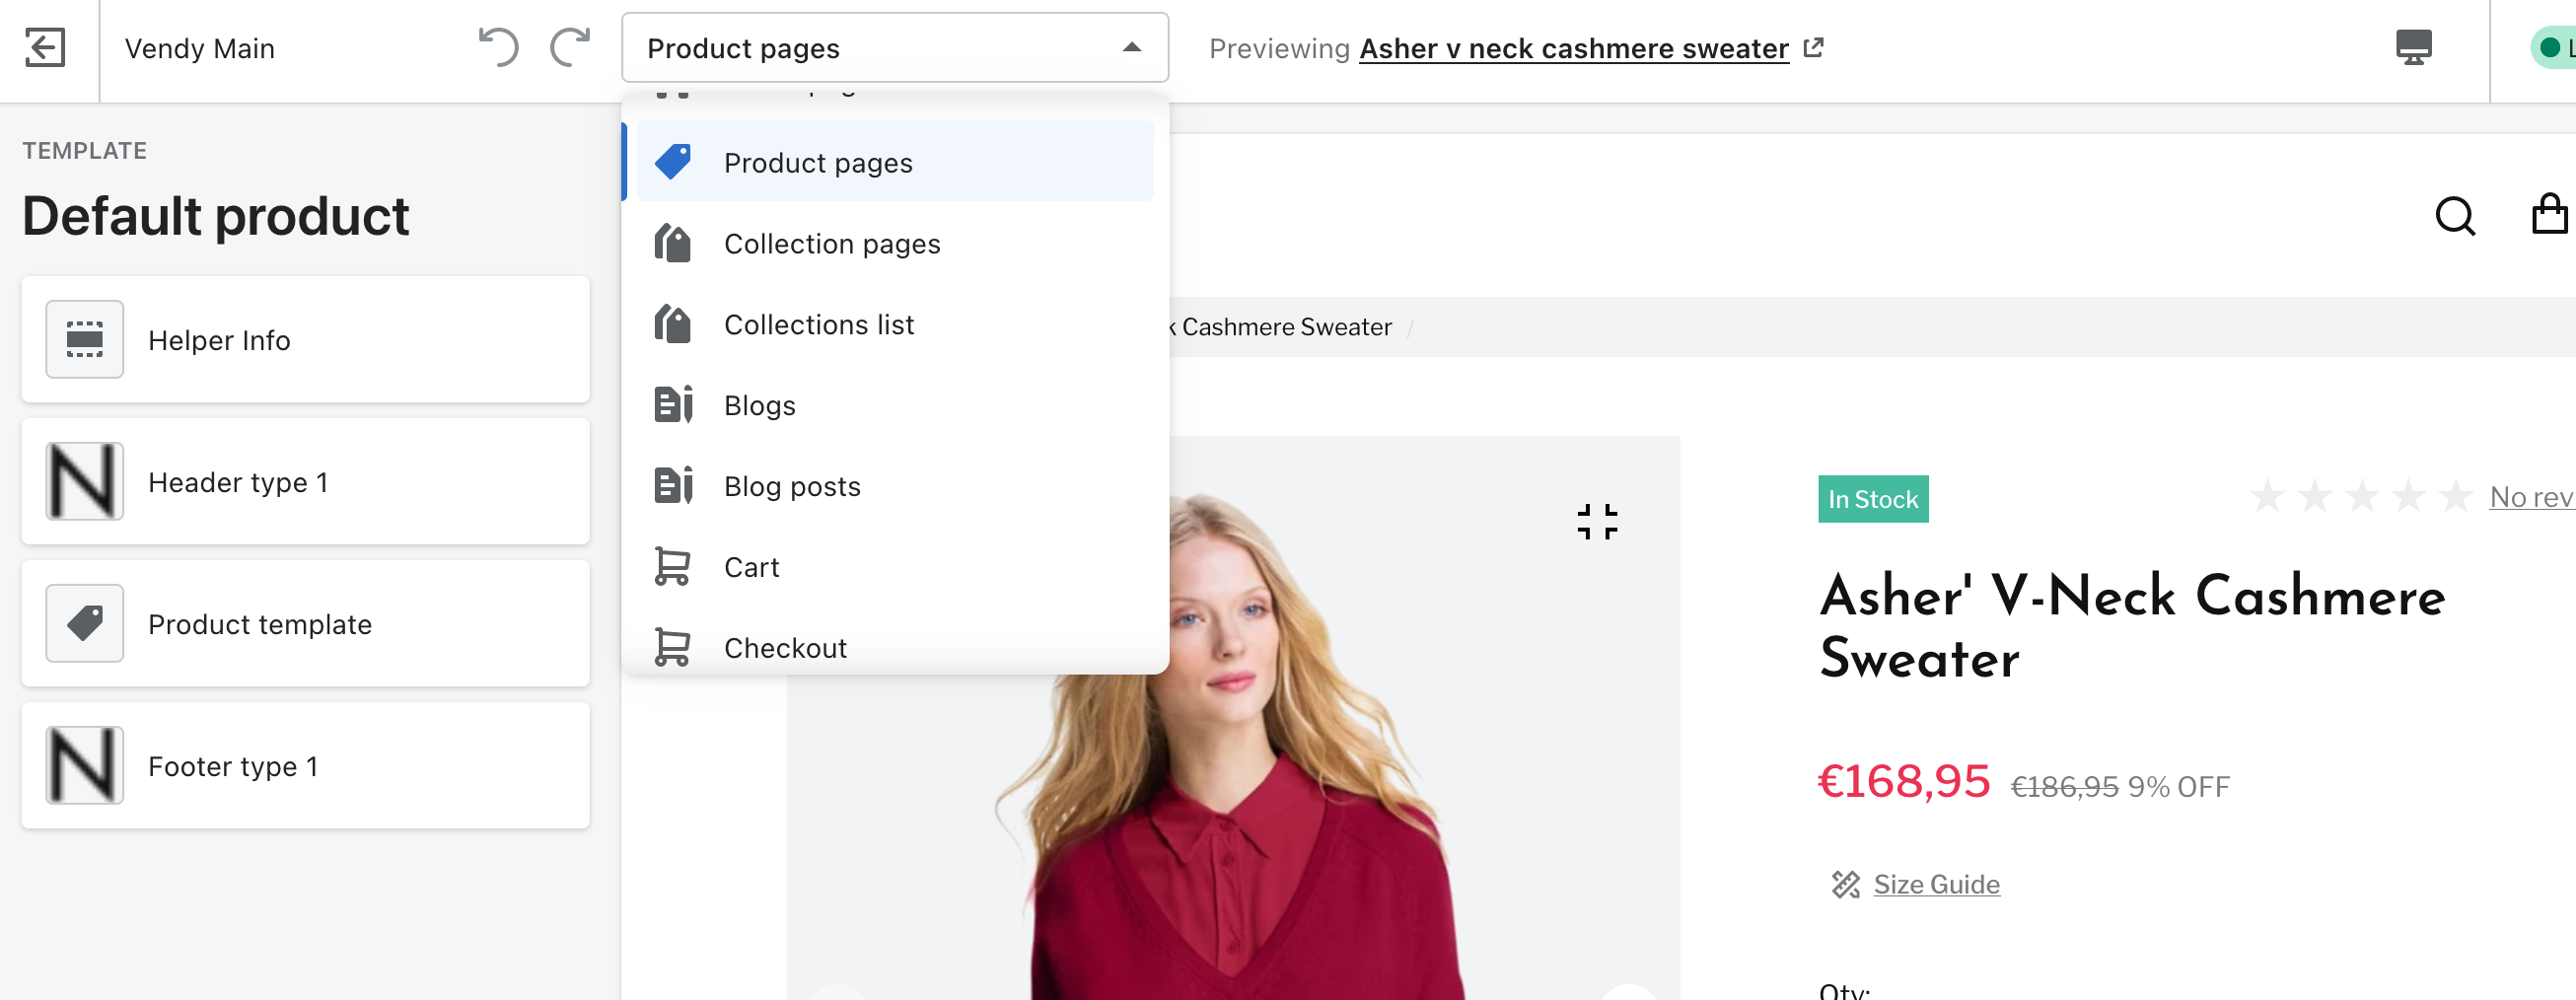
You can adjust the delivery policy display under Online Store -> themes -> Customize.
In the dropdown at the top choose product pages:
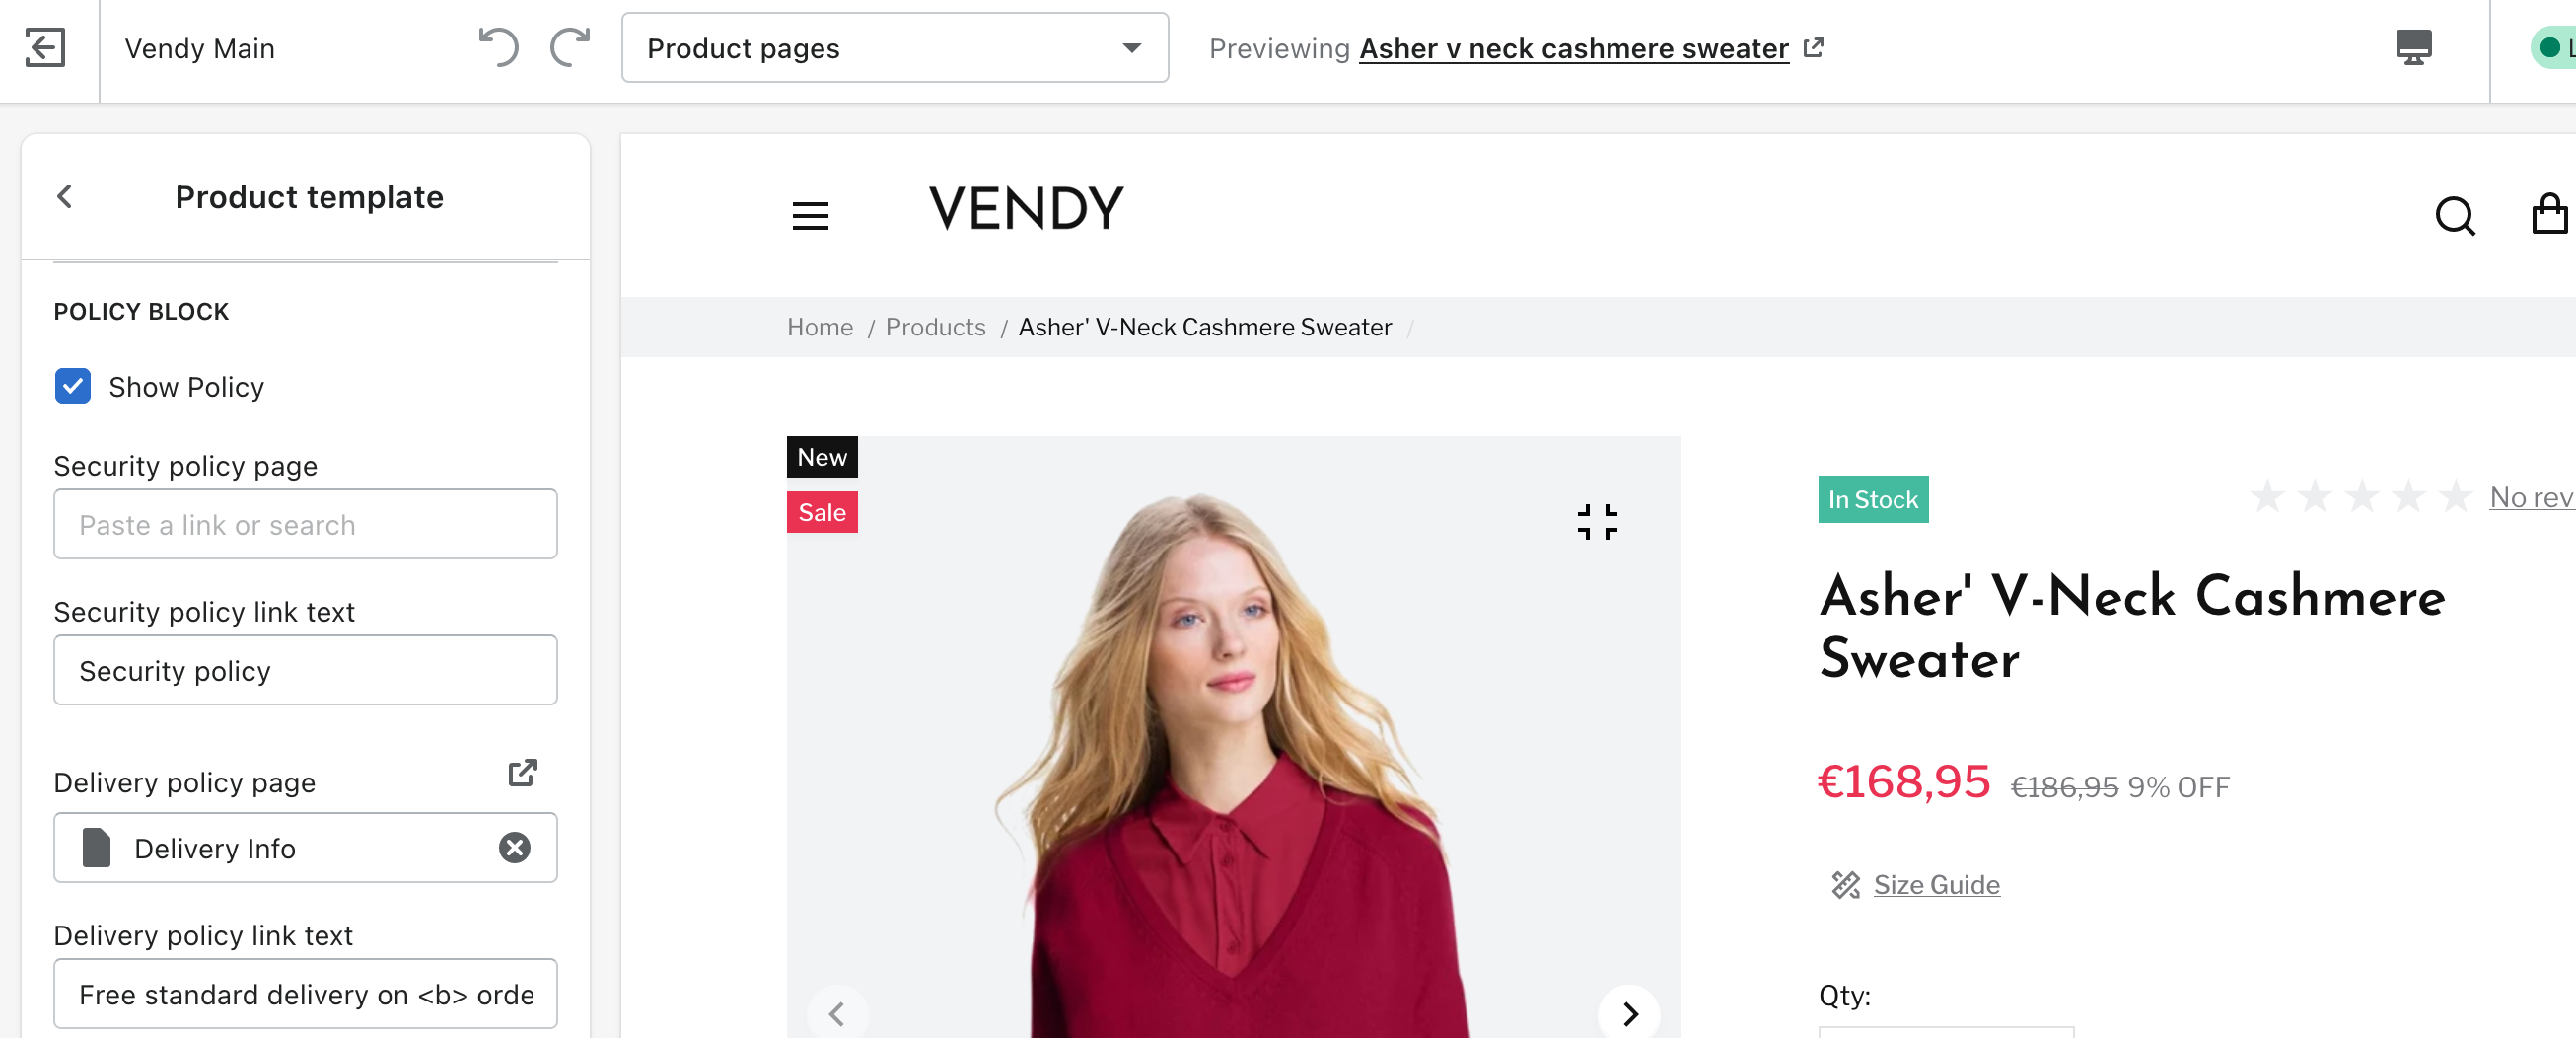
After that click on the Product template tab and scroll down to the Policy block.
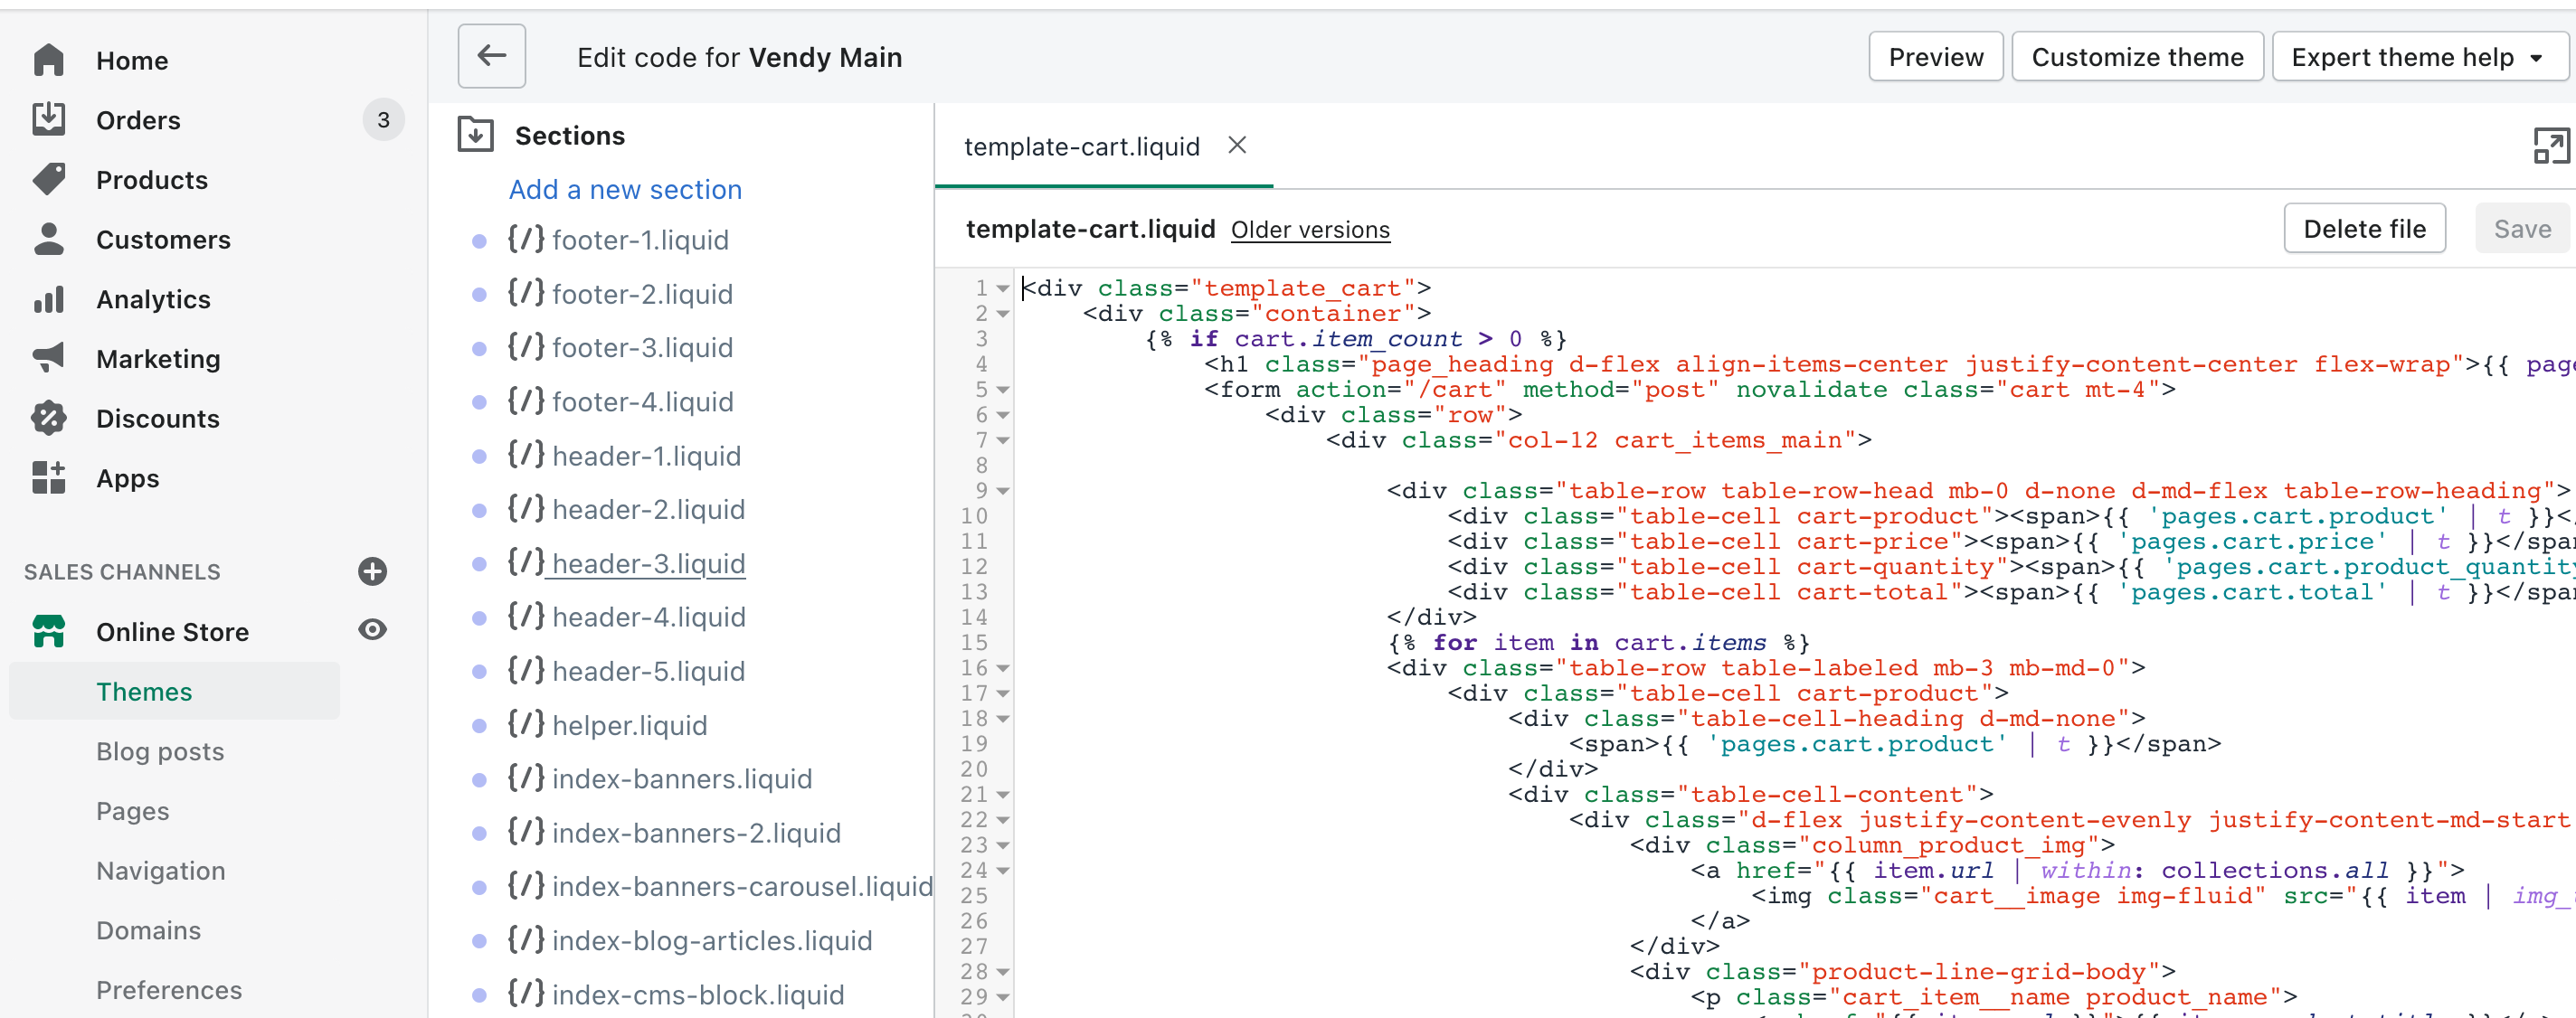
How to edit the Cart page?
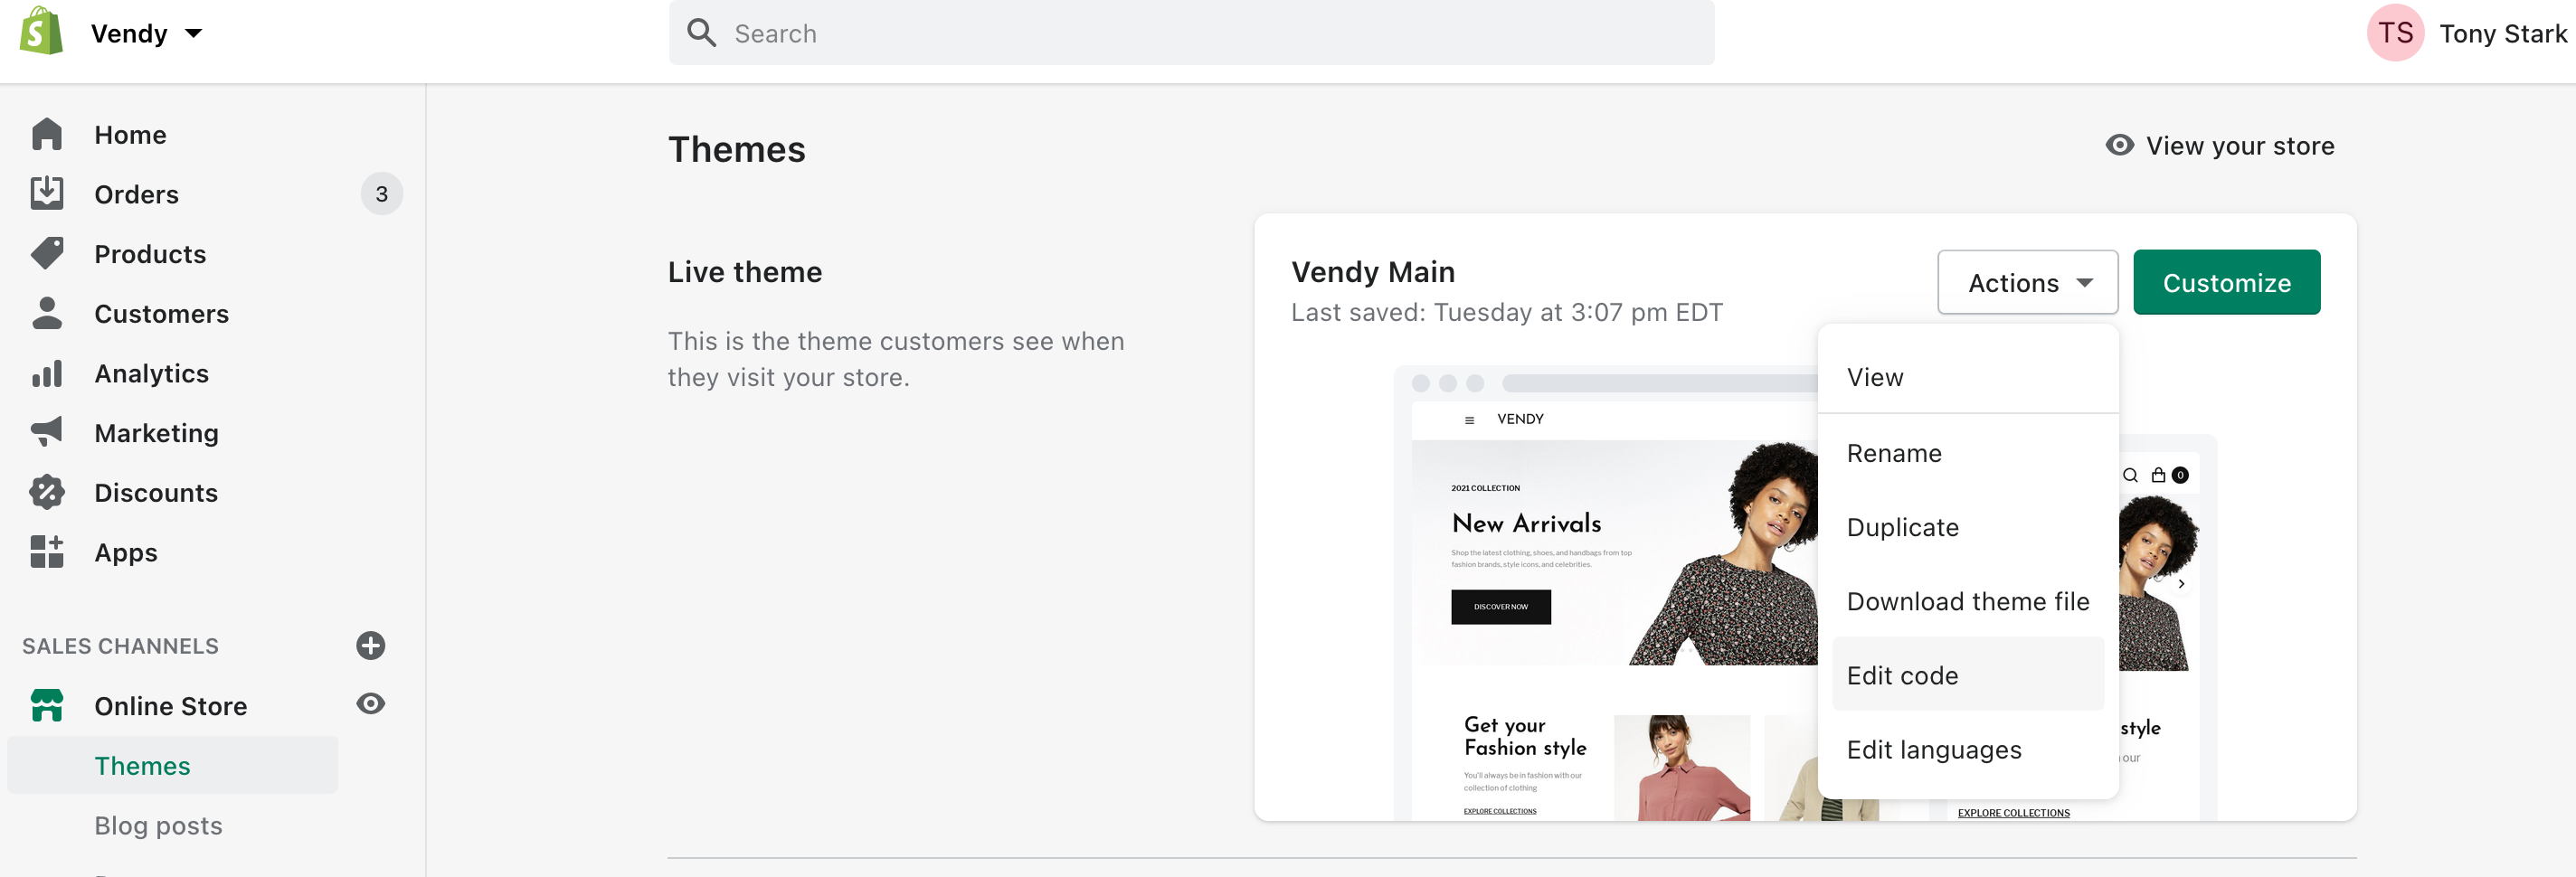
The cart page can be adjusted through Online Store -> Themes -> Actions -> Edit code.
Scroll down to the Sections and adjust the template-cart.liquid.
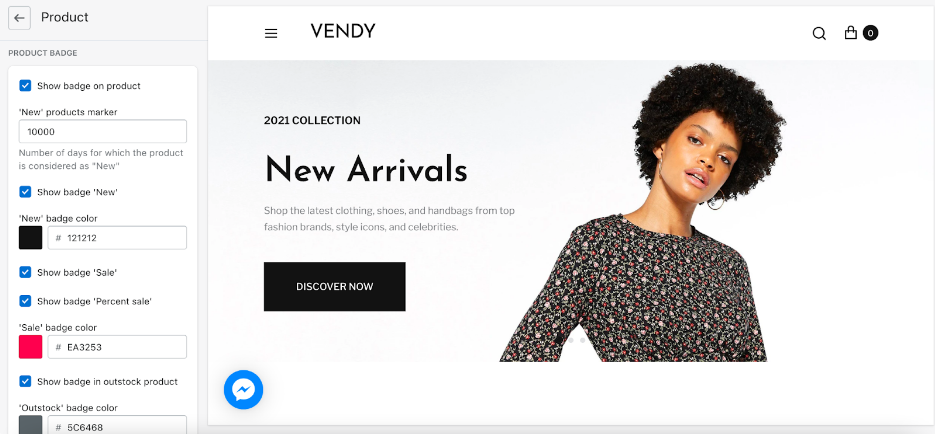
How to manage Product Badges?
You can adjust badges under Online Store -> Themes -> Customize -> Theme settings -> Product settings.
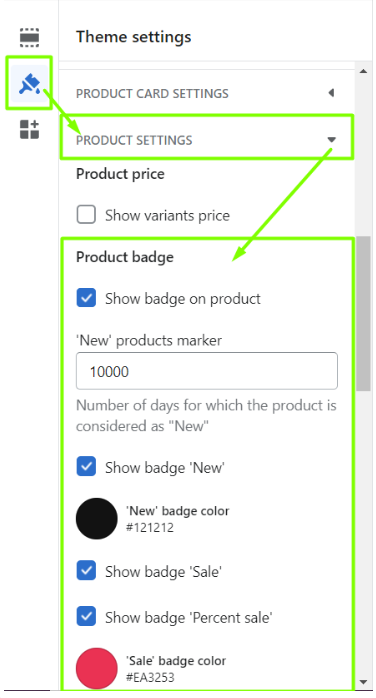
Scroll down to the Product badge.
Instagram Feed
Instagram in-built section cannot be used anymore due to API restrictions from 2020, Facebook stopped the support of the old API.
In order to have the Instagram feed, you can install an application.
Please, note that we do not support any third party extensions since they were not developed by us and cannot guarantee the correct work of the site due to script interaction. All the support should be provided by the application support/developer.
How to install a .fig file in theme?
The .fig file is included in the package in case you might need to edit the layout in Figma. This file is not needed for template installation.
How to use a google font?
The theme comes with predefined list of Shopify fonts you can select from in Theme settings -> Typography inside the Theme Customizer:
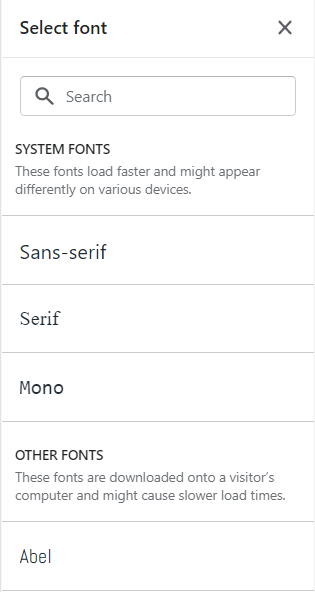
Shopify's font library is a collection of fonts that includes system fonts, a selection of Google fonts, and licensed fonts from Monotype. These fonts are free to use on Shopify online stores, and are provided in both WOFF and WOFF2 formats.
You can add custom fonts using these links: link1, link2, link3, link4.
How to change Logo size?
You can increase maximum width and height values for the logo in Online Store -> Themes -> Actions -> Edit code -> Sections in the needed header type header-1.liquid / header-2.liquid / header-3.liquid around line 490.
How to set social Icons?
Social icons are set with the help of svg icons.
We attach useful links regarding svg icons usage.
You can add more items by adding more blocks in the same format to Online Store -> Themes -> Actions -> Edit code -> Snippets -> social-icon-link.liquid:
...and then add variables of the new icon to Online Store -> Themes -> Actions -> Edit code -> Config -> settings_data.json and settings_schema.json and set the text in Online Store -> Themes -> Actions -> Edit code -> Locales -> en.default.jso (or the language file you use).
Alternatively, you can change just existing svg icons in Online Store -> Themes -> Actions -> Edit code -> Snippets -> social-icon-link.liquid.
Please, check the links below to help you with managing svg icons: - Build an app to power Shopify’s millions of merchants. - Adding more font icons to Shopify Timber Framework. - Using SVG icons in Shopify.
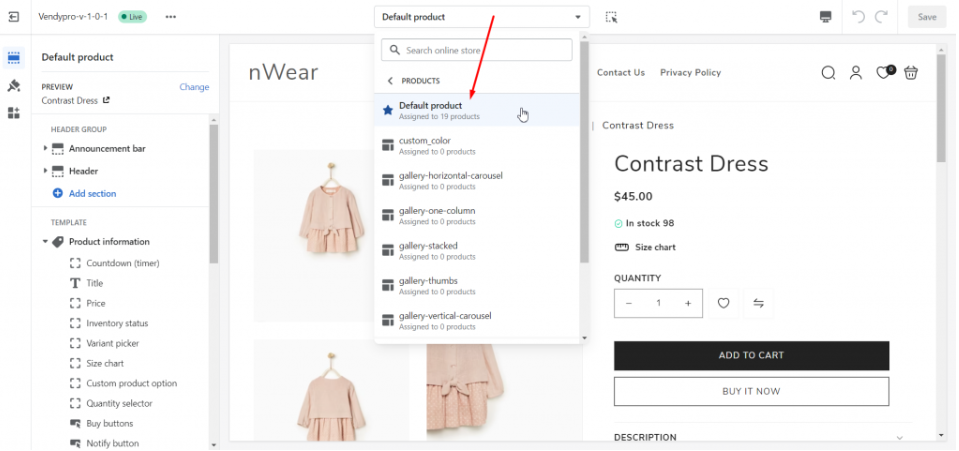
How to manage policy links?
You can manage policy links through Online Store -> Themes -> Customize -> select Products -> Default product from dropdown -> Product template -> Policy block:

How to manage color swatches?
If you want the color options not to be displayed in dropdowns, it is enough to enable Show color options in Online Store -> Themes -> Customize -> Product pages -> Product template -> Settings.
Standard color names for color options reflect the corresponding colors in the frontend by default in Shopify. If you set a custom title, a white or grey circle is displayed instead.
If you want to set custom colors or images for color product variants, you may use the links below to help you with it: link1, link2. For more details, please, visit the forum as the issue is Shopify the engine itself, not theme related.
If you want us to integrate the changes for you, we may perform it within the "Add Product Color Swatches" service for $149. If you are interested, please, use this link to get it and provide us with the Order ID or purchase email once it is ordered: Shopify Color Swatches.
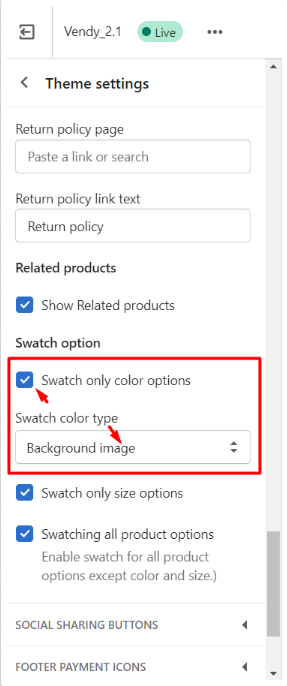
In Vendy 2 color swatches can be enabled/disabled in Online Store -> Themes -> Customize -> Theme settings -> Product settings -> Swatch only color options with the Background image selection.
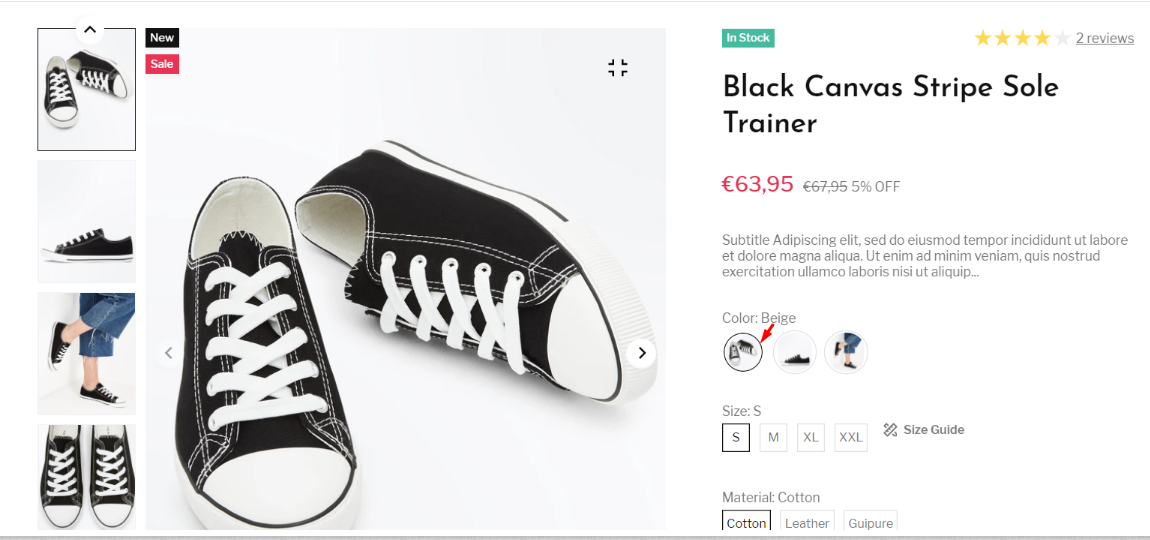
Once color variant options are added for a product and images are uploaded for options, the image associated with a color variant option will display in the circle.
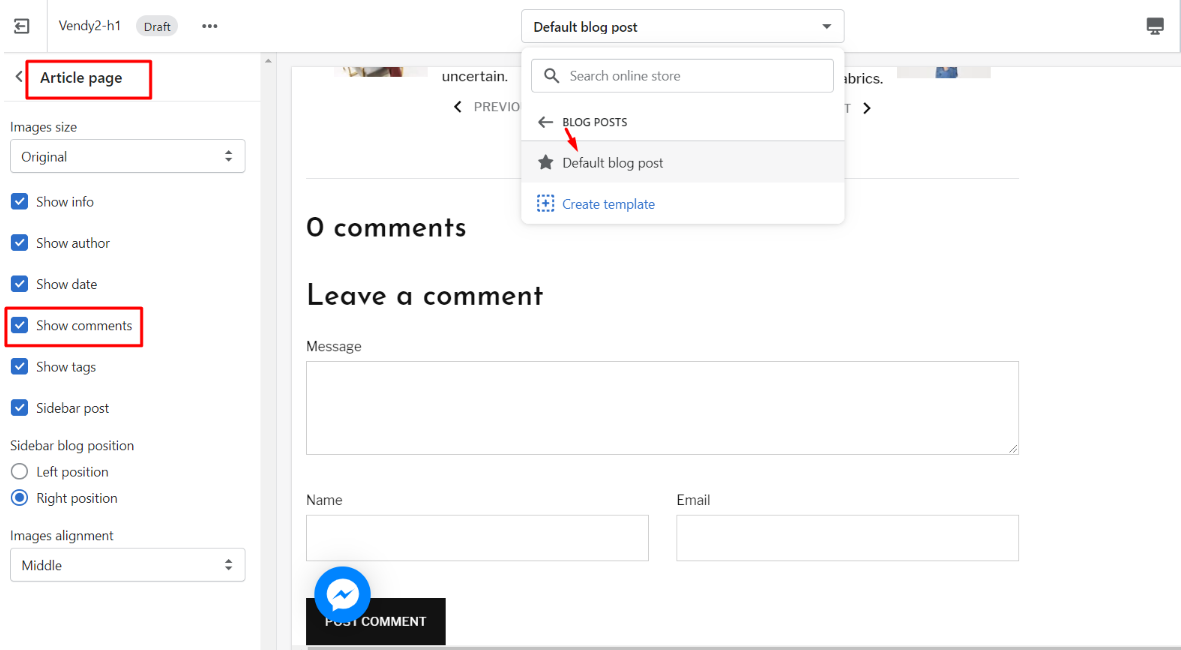
How to enable blog comments?
Comments can be enabled for blog posts in Online Store -> Themes -> Customize -> select Blog posts -> Default blog post from dropdown -> Article page -> Show comments.
How to edit main menu links?
You can modify the main megamenu links in the Customization tool area by pressing on the arrow near Header:
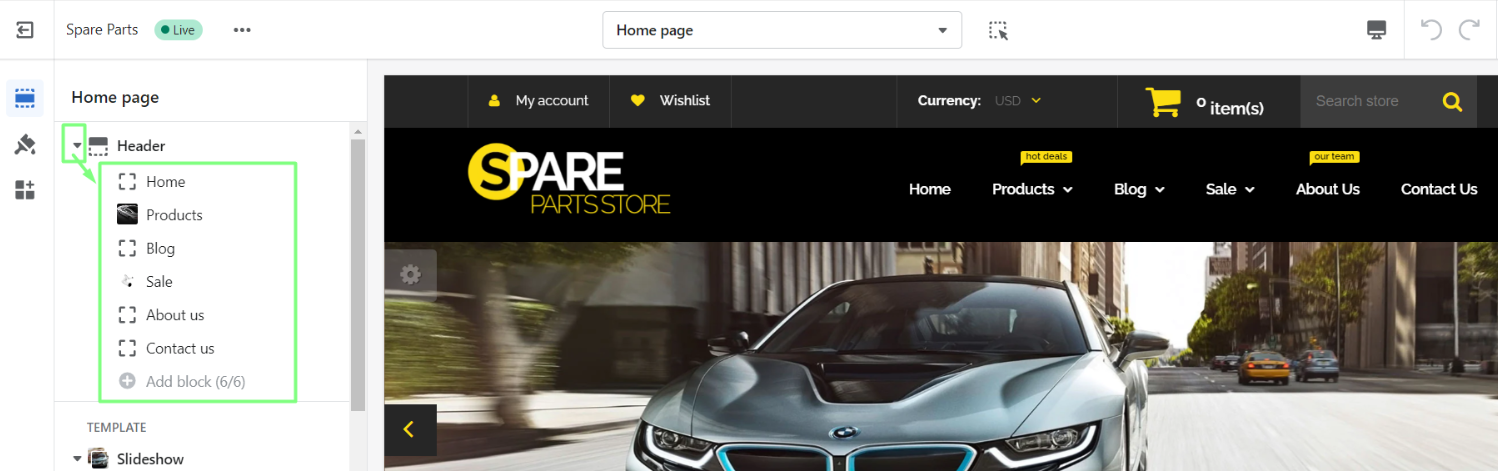
Press on the needed menu item to edit or remove it:
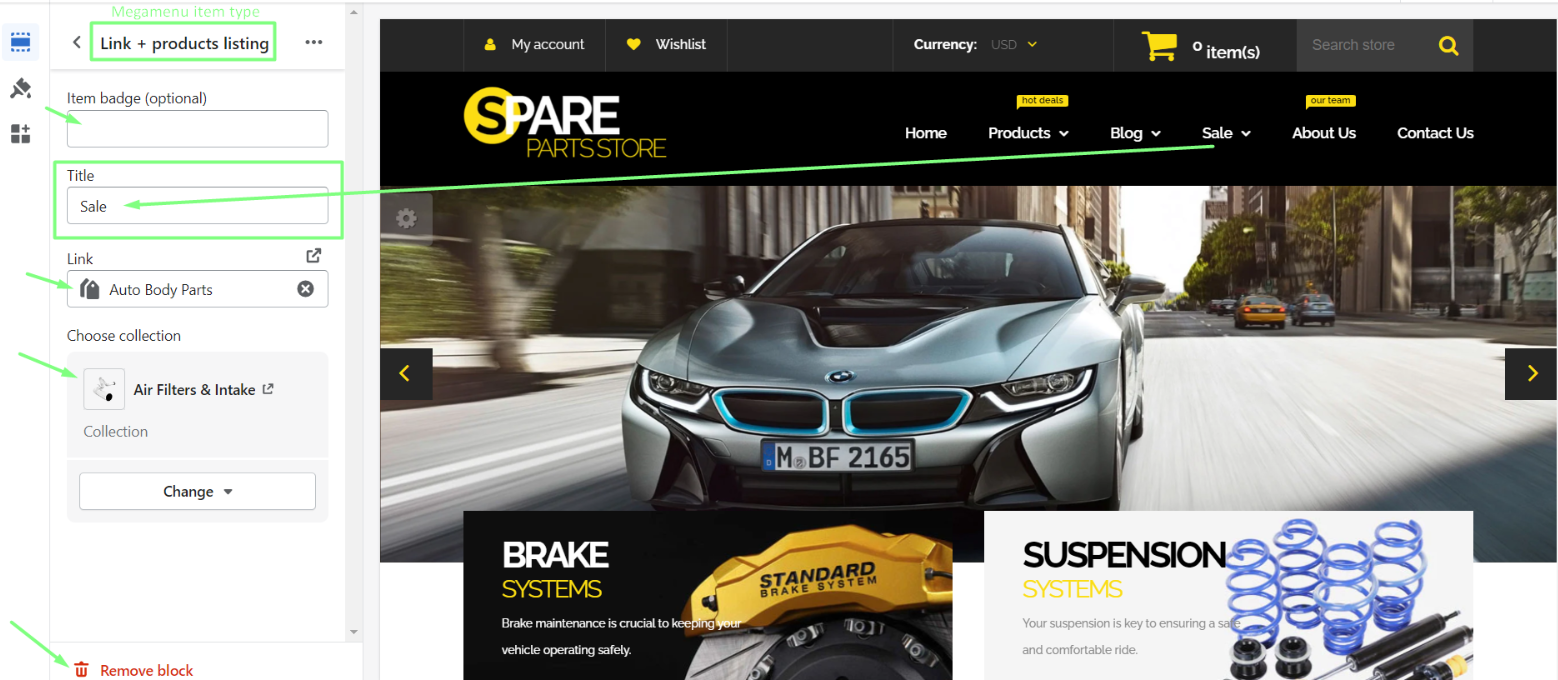
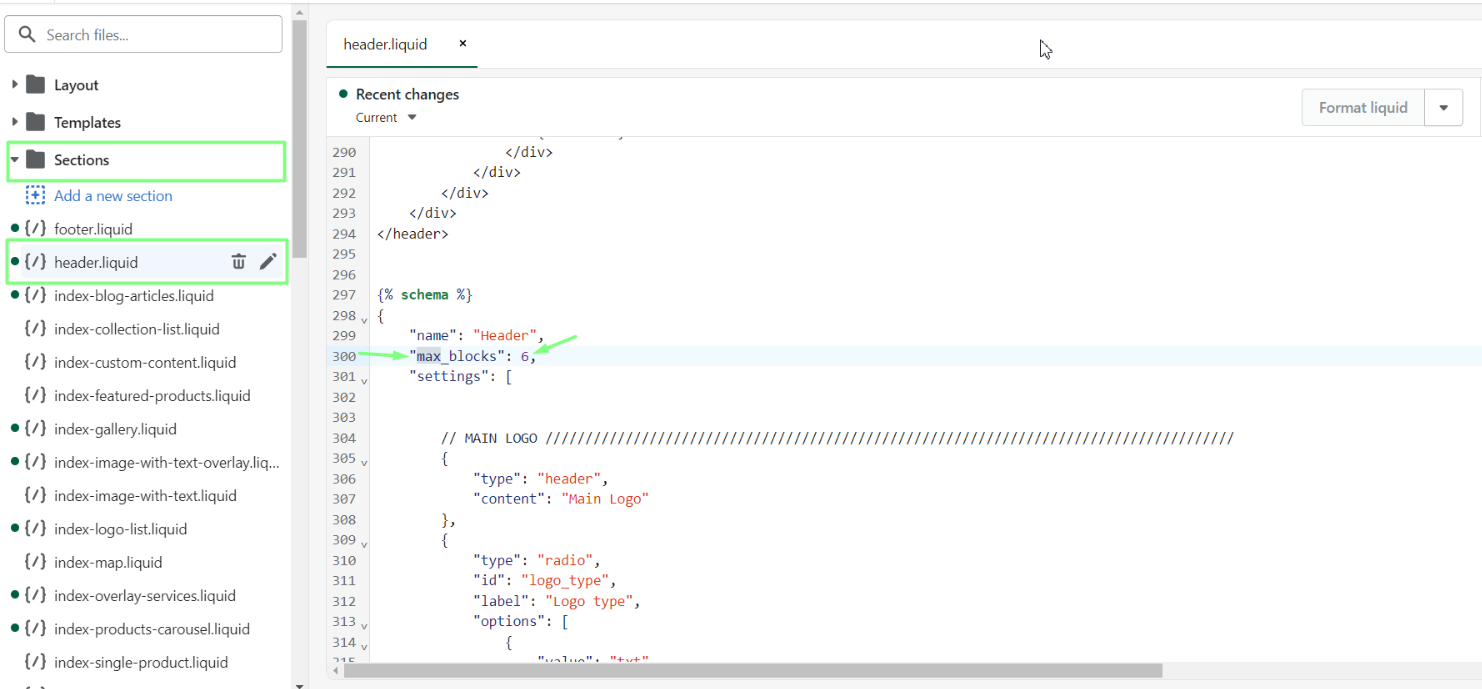
You can increase the maximum number of megamenu items in Online Store > Themes > your theme > … > Edit code > Sections > header.liquid:
How to output Reviews on the Product page using the Drawer in Shopify?
Customer reviews are one of the most powerful tools a company has to turn leads into customers and increase sales. Not only are they social proof that your product or service is worth buying, but they can also be valuable marketing tools. Feedback is an important sales driver. When we choose a product, we increasingly turn to the reviews and ratings of those who have already bought it. And there is no need to invent something new. It is enough to use already proven methods of working with customer reviews and ratings. How to output Reviews on the Product page using the Drawer in Shopify? We will talk about this in detail.
Make sure that you have installed and activated a Reviews app first since this is not part of the default Shopify functionality.
Vendy Pro demo uses this free app.
Another free app.
You can use any app you prefer. Please, note that we do not support any third-party extensions since they were not developed by us and cannot guarantee the correct work of the site due to script interaction. All the support should be provided by the application support/developer. We recommend installing apps with a free trial period so you could check if it works correctly and fits you.
Open Online Store > Themes. Click on the three dots near your theme and select Customize.
Press on Home page in the top and select Products and then select Default product or the needed product template:
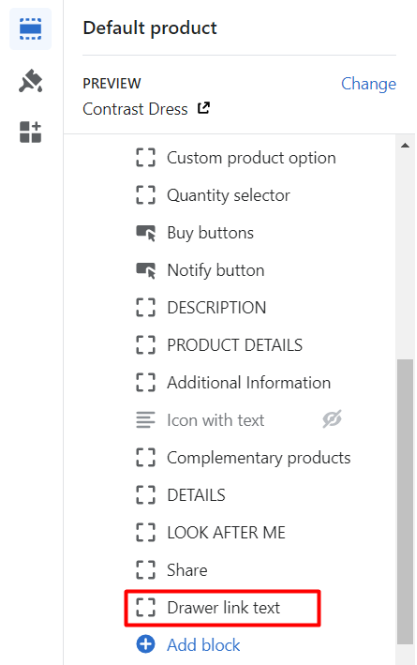
Scroll down till the end of the Product information components, press on Add block and select Drawer for all products (select Drawer for products from collection if you want to display reviews in a drawer for products from a certain collection only):

Click on the added drawer block so we could configure it to display product reviews.
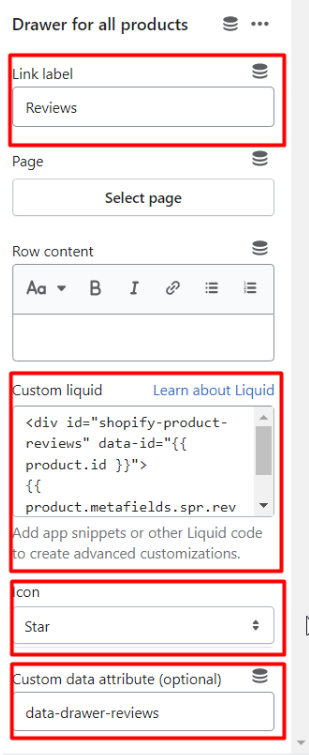
Fill in the following fields:
- Link label - change the default title Drawer link text to Reviews or the title you want to display for customers.
- Custom liquid - paste this code:
- Icon - select Star instead of the default Checkmark.
- Custom data attribute (optional) - paste data-drawer-reviews.
  <div id="shopify-product-reviews" data-id="{{ product.id }}">
    {{ product.metafields.spr.reviews }}
  </div>
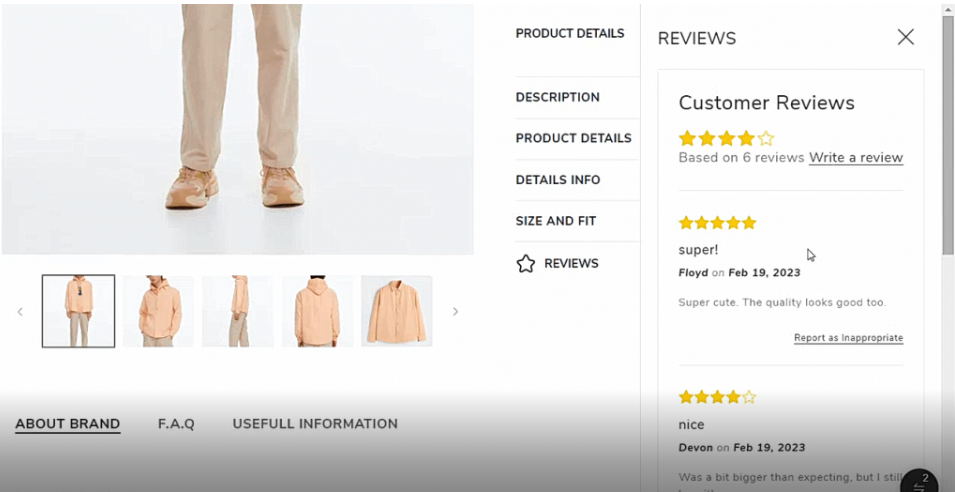
Save the changes and check the result on the site:
If you don’t have enough reviews, it’s not a problem. Make it easy for customers to leave reviews on your website or social media pages. Provide clear instructions on how to do this and make the review process as easy as possible. Don’t be afraid to ask your customers for feedback. In fact, you should actively seek feedback from customers after every transaction. This will help you collect reviews that are honest and up-to-date. Thank customers for their reviews, even if they don’t leave them. This shows that you value their feedback and are serious about making your business the best it can be.
How to Display Mega Menu and Dropdown Simultaneously in Shopify?
With the mega menu, you can make the navigation through your store smooth and organize your content properly. By creating a compound menu in the dropdown form, you will give visitors immediate access to any category on your site.
Mega Menu in Shopify
Mega menus allow you to display several menus across your store's main navigation from one dropdown. The website allows customers to easily navigate through your store by displaying all of your products and collections.
Here is a great tutorial on how to build the basics of store navigation on Shopify. To get a grasp of the upcoming tutorials, please first visit their tutorial if you have no prior knowledge of website navigation.
How to Display Mega Menu and Dropdown Simultaneously Step-by-Step Guide
1. Go to Online Store -> Navigation and chose a menu to edit.
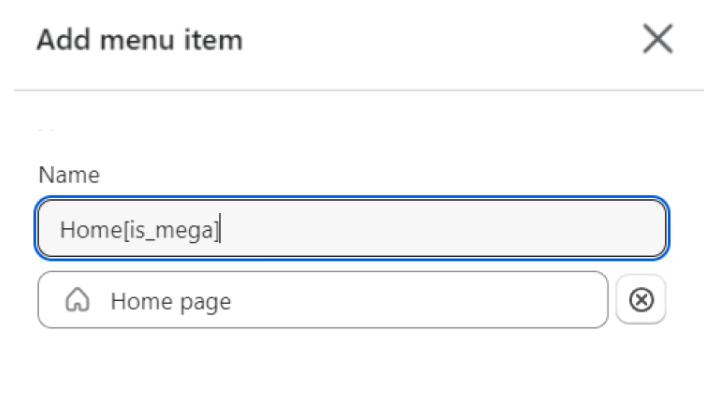
2. Add a new menu item or edit an existing one.
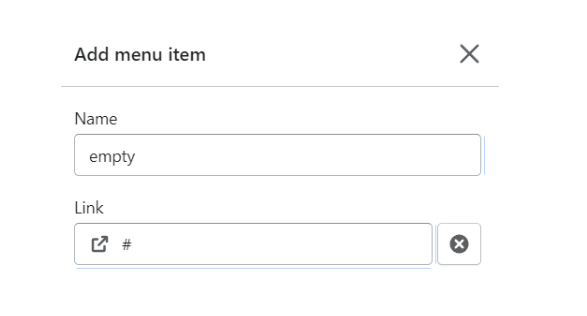
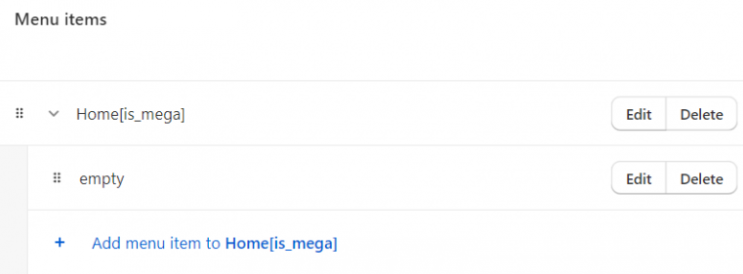
3. Add [is_mega] to the name field and hash sign (#) to the link field.
4. Add a new menu item, type “empty” in the name field, and hash sign (#) in the link field.
5. Drag the empty item to the right to make it a submenu item.
6. Go to Online Store -> Themes -> Customize.

7. Choose and add a new block to the header.
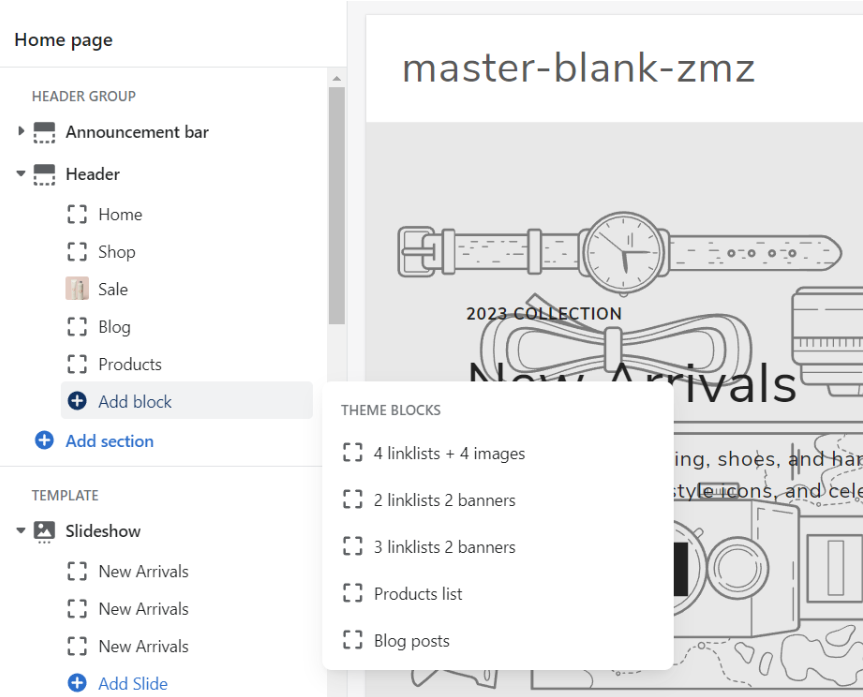
8. Go to edit the block you chose and type your menu title in the for item field.
How to manage Filter Color Media using meta fields?
Shopify is a great platform for creating your own online store, as when developing a site on this platform, you can easily do without programming and web design skills, and you can create a store in just a few days. However, we all want the store to be fully optimized and, as a result, give a high conversion rate. To do this, you need to take the development process more seriously and think through everything to the smallest detail. This approach will help you avoid stupid mistakes, which will be followed by a waste of time and money. Today we will tell you how to manage Filter Color Media using meta fields.
Getting Started with managing Filter Color Media using meta fields
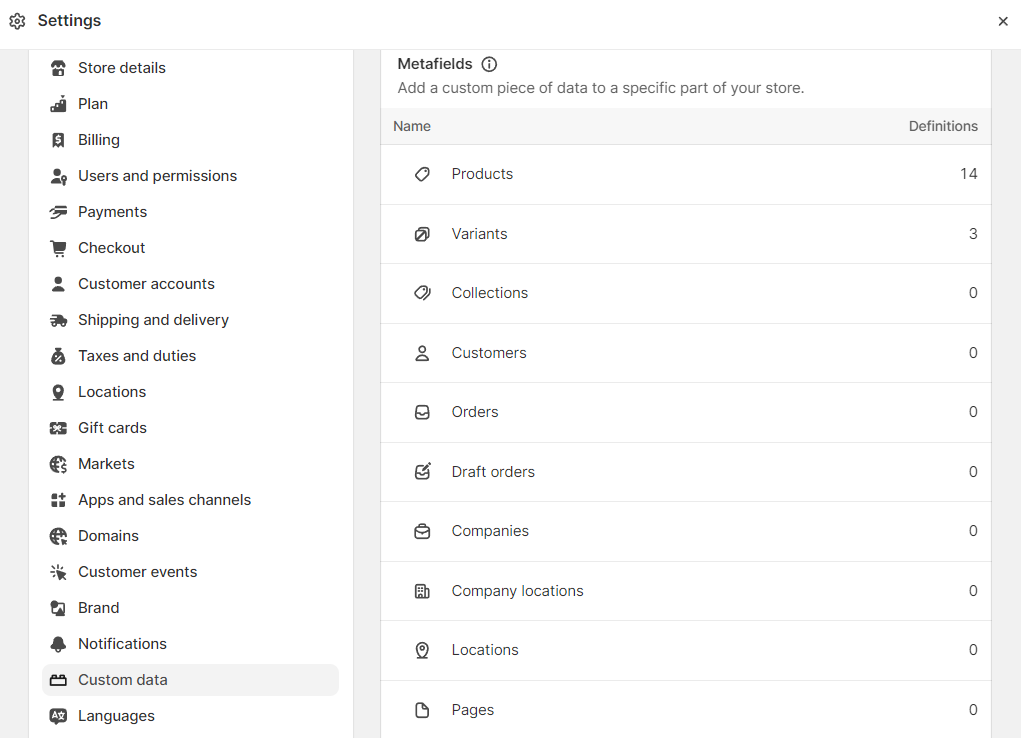
1. First, navigate to Settings > Custom data.
2. Then in the Meta fields area select Products.
Click Add definition.
You will see the following fields:
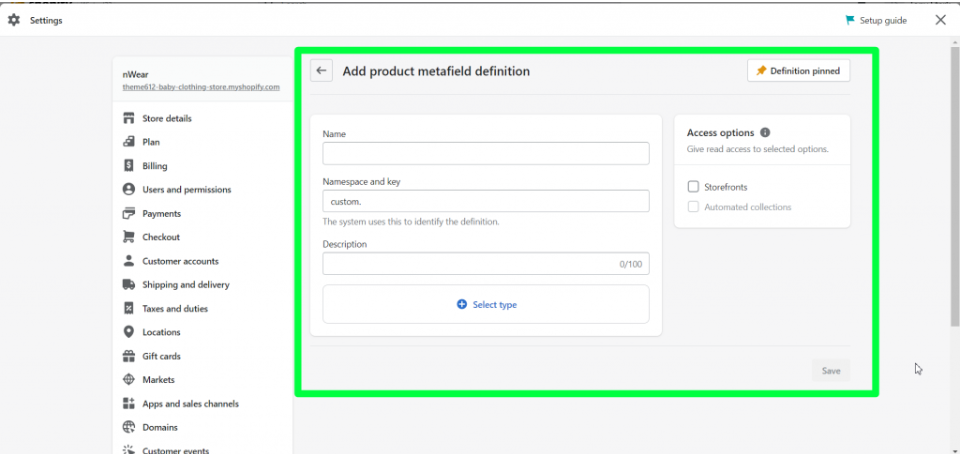
Let’s fill in the fields for our metafield that will display product media based on color option:
- Name: Filter color media.
- Namespace and key: custom.filter_color_media.
- Description: Images of a current variant only after selecting a variant.
- Select type: Choose Single line text.
In the right-handed area Access options, you should select where you want to use the meta field. You can read about it in the documentation.
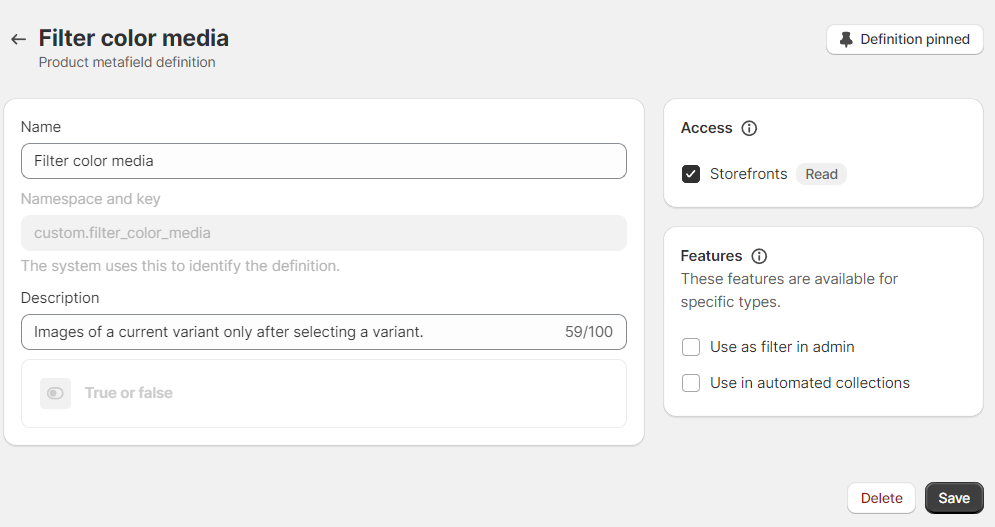
Once all the needed information is filled in, save the changes and you will see the meta field we added to the list of Product meta field definitions:

Now we are ready to add the metafield to the needed products through the Products Area.
Open the needed product and scroll down to the Meta fields area at the bottom with the Filter color media product meta field we created.

Enter True to the Filter color media product meta field we created and save the changes.

How to manage Custom colors by hex or image url?
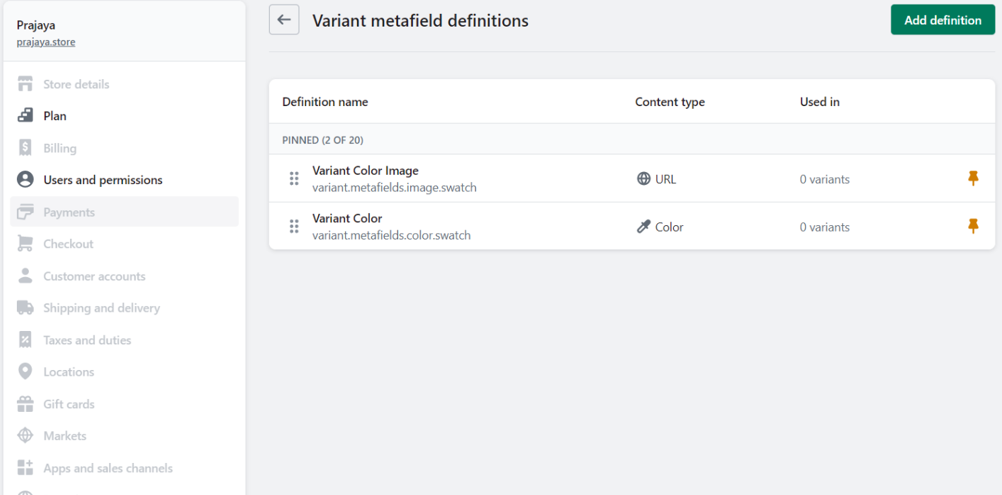
1. Firstly, create metafields in your Shopify admin panel. - variant.metafields.color.swatch - variant.metafields.image.swatch
2. Click 'Edit' on variant product.
3. Set color or paste link from 'content -> files'.
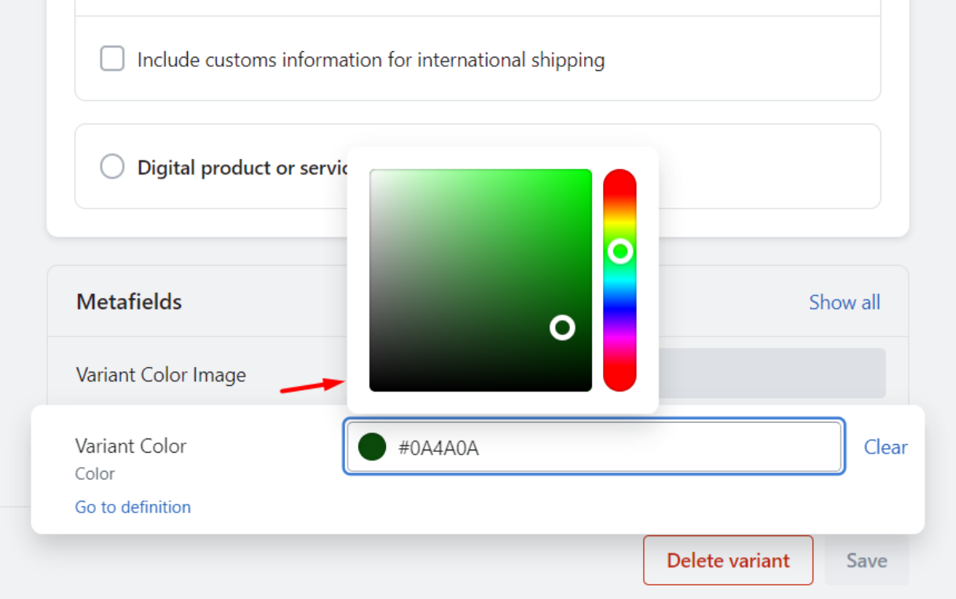
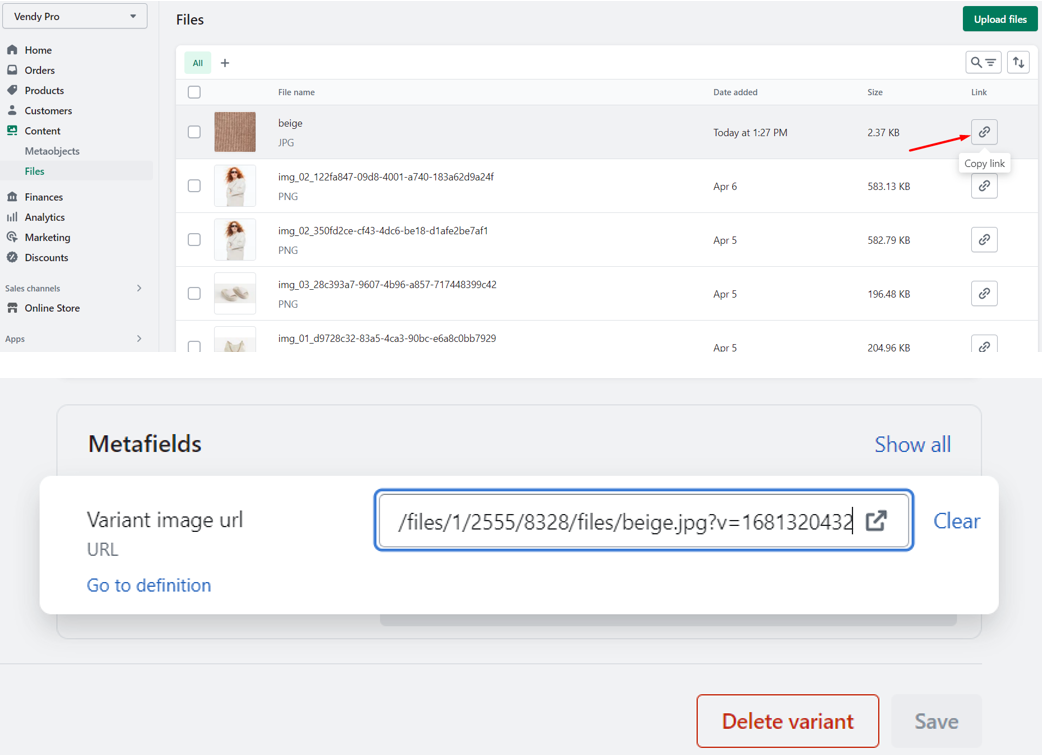
4. Save the changes.
Attention! Color data must be set for all product variants that use this color.