imPresta
TM Mega Layout 1.0.0
If you want to switch to the layout with left column, you need to activate the left column for the main page. Navigate to Preferences -> Theme -> Advanced Settings -> Appearance of columns and enable the left column for index page.
This module is designed to allow creating custom layouts (presets) for hooks and displaying them at site instead of the default positions. This module advantage is allowing you to create different hook markups and modify them up to your needs.
Functional characteristics and features of the module
-
Requirements:
PrestaShop 1.6+
PHP 5.4+
-
Features:
Module includes 5 hooks: 'Header', 'Top Column', 'Home', 'Footer' and 'Product Footer'.
In case module is not present in the hook, it can't be added to the preset.
Module can be displayed in the preset only once, the same as in a hook.
Module position in 'Modules and Services -> Positions' section does not affect the preset.
The module does not allow you to configure different modules. You cannot set different modules configuration for various presets.
Module provides you with an option for changing module position and setting up the grid for 3 hooks: displayTopColumn, displayHome, displayFooter. Changing the modules position in 'Modules and Services -> Positions' section will not affect the modules position in the preset. In case the module was not added to the hook, it can't be added to the preset either.
Integrating module to the theme
Without this step your presets will not be displayed at the frontend.
Top column. In order to add custom preset to the topColumn hook, you need to perform the following steps:
- Open the /themes/your_theme/header.tpl file for editing.
- Locate the following code
{hook h="displayTopColumn"} - And replace it with:
{assign var='displayMegaTopColumn' value={hook h='tmMegaLayoutTopColumn'}}
{if $displayMegaTopColumn}
    {hook h='tmMegaLayoutTopColumn'}
{else}
    {capture name='displayTopColumn'}{hook h='displayTopColumn'}{/capture}
    {if $smarty.capture.displayTopColumn}
        <div id="slider_row" class="row">
            <div id="top_column" class="center_column col-xs-12 col-sm-12">{$smarty.capture.displayTopColumn}</div>
        </div>
    {/if}
{/if}
Home. In order to add custom preset to the Home hook, you need to perform the following steps:
- Open the /themes/your_theme/footer.tpl file for editing.
- Locate the following code:
{if isset($HOOK_HOME) && $HOOK_HOME|trim} <div class="home-column"> <div class="container"> {$HOOK_HOME} </div> </div> {/if} - And replace it with:
{assign var='displayMegaHome' value={hook h='tmMegaLayoutHome'}}
{if $displayMegaHome}
    {hook h='tmMegaLayoutHome'}
{else}
    {if isset($HOOK_HOME) && $HOOK_HOME|trim}
        {$HOOK_HOME}
    {/if}
{/if}
Footer. In order to add custom preset to the Footer hook, you need to perform the following steps:
- Open the /themes/your_theme/footer.tpl file for editing.
- Locate the following code:
{if isset($HOOK_FOOTER)} <div class="footer-container"> <footer id="footer" class="container"> <div class="row"> {$HOOK_FOOTER} </div> </footer> </div> {/if} - And replace it with:
{assign var='displayMegaFooter' value={hook h='tmMegaLayoutFooter'}}
{if isset($HOOK_FOOTER) || $displayMegaFooter}
    <div class="footer-container">
    {if $displayMegaFooter}
         <div id="footer">
              {$displayMegaFooter}
         </div>
    {else}
        <div id="footer" class="container">
            <div class="row">{$HOOK_FOOTER}</div>
        </div>
    {/if}
    </div>
{/if}
Header. In order to add custom preset to the Header hook, you need to perform the following steps:
- Open the /themes/your_theme/header.tpl file for editing.
- Locate the following code:
{capture name='displayNav'}{hook h='displayNav'}{/capture} {if $smarty.capture.displayNav} <div class="nav"> <div class="container"> <div class="row"> <nav>{$smarty.capture.displayNav}</nav> </div> </div> </div> {/if} <div> <div class="container"> <div class="row"> <div id="header_logo"> <a href="{if isset($force_ssl) && $force_ssl}{$base_dir_ssl}{else}{$base_dir}{/if}" title="{$shop_name|escape:'html':'UTF-8'}"> <img class="logo img-responsive" src="{$logo_url}" alt="{$shop_name|escape:'html':'UTF-8'}"{if isset($logo_image_width) && $logo_image_width} width="{$logo_image_width}"{/if}{if isset($logo_image_height) && $logo_image_height} height="{$logo_image_height}"{/if}/> </a> </div> {if isset($HOOK_TOP)}{$HOOK_TOP}{/if} </div> </div> </div> - And replace it with:
{assign var='displayMegaHeader' value={hook h='tmMegaLayoutHeader'}}
{if isset($HOOK_TOP) || $displayMegaHeader}
  {if $displayMegaHeader}
    {$displayMegaHeader}
  {else}
    {capture name='displayNav'}{hook h='displayNav'}{/capture}
    {if $smarty.capture.displayNav}
    <div class="nav">
      <div class="container">
        <div class="row">
          <nav>{$smarty.capture.displayNav}</nav>
        </div>
      </div>
    </div>
    {/if}
    <div>
      <div class="container">
       <div class="row">
        <div id="header_logo">
          <a href="{if isset($force_ssl) && $force_ssl}{$base_dir_ssl}{else}{$base_dir}{/if}" title="{$shop_name|escape:'html':'UTF-8'}">
            <img class="logo img-responsive" src="{$logo_url}" alt="{$shop_name|escape:'html':'UTF-8'}"{if isset($logo_image_width) && $logo_image_width} width="{$logo_image_width}"{/if}{if isset($logo_image_height) && $logo_image_height} height="{$logo_image_height}"{/if}/>
          </a>
        </div>
        {$HOOK_TOP}
       </div>
     </div>
    </div>
  {/if}
{/if}
Product footer. In order to add custom preset to the Product footer hook, you need to perform the following steps:
- Open the /themes/your_theme/product.tpl file for editing.
- Locate the following code:
{if isset($HOOK_PRODUCT_FOOTER) && $HOOK_PRODUCT_FOOTER}{$HOOK_PRODUCT_FOOTER}{/if} - And replace it with:
{assign var='displayMegaProductFooter' value={hook h='tmMegaLayoutProductFooter'}}
  {if isset($HOOK_PRODUCT_FOOTER) || $displayMegaFooter}
    {if $displayMegaProductFooter}
      {$displayMegaProductFooter product=$product category=$category}
    {else}
      {$HOOK_PRODUCT_FOOTER}
    {/if}
  {/if}
Hooks
The module has 5 hooks available by default:
- 'Header' is a hook that combines 2 standard hooks: displayNav and displayTop. This hook corresponds to the website header.
- 'Top Column' corresponds to the original displayTopColumn hook. This hook comes right after the Header hook.
- 'Home' corresponds to the original displayHome hook. This hook is present only on the main page.
- 'Footer' corresponds to the original displayFooter hook.
- 'Product Footer' corresponds to the original displayFooterProduct hook, which is displayed in product page footer.
TM Mega Layout Main Panel
The main TM Mega Layout module configuration panel that allows you to add a preset to the required hook and configure the preset.

Adding the preset
-
Press '+ Add Preset' (1) in the needed tab.

-
Next, fill in the 'Enter layout name' field in the popup typing the new preset (2) title there and press 'Save' (3).
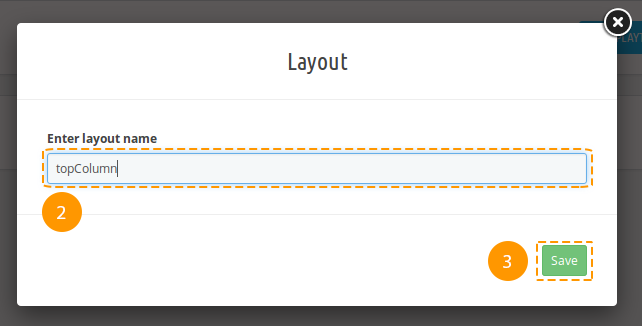
-
Preset was successfully created, it's listed among the available presets (4) now. Newly created preset is selected for editing (5).

Preset activation
-
First of all, select the needed preset from the list (1).

-
Press the 'Use as default' (2) switcher.

-
The preset was activated. If you need to display this preset only on some pages, open the dropdown (3) and select the pages you need. To apply changes, click outside the list area. A preset that is displayed on all pages will be marked with a filled star in the presets list, and the one that is displayed only on some pages will be marked with a partially filled star.

Removing the preset
There is no option to restore the preset after removing.
-
In order to remove the preset, choose the required preset among the list (1).

-
Next, press a cart (2) near the preset title.

-
Preset was successfully removed.
Renaming the preset
-
In order to rename the preset, choose the required preset among the list (1).

-
Next, press a pencil icon (2) next to the preset title.

-
Specify the new preset title (3) in a popup and press 'Rename layout' (4).
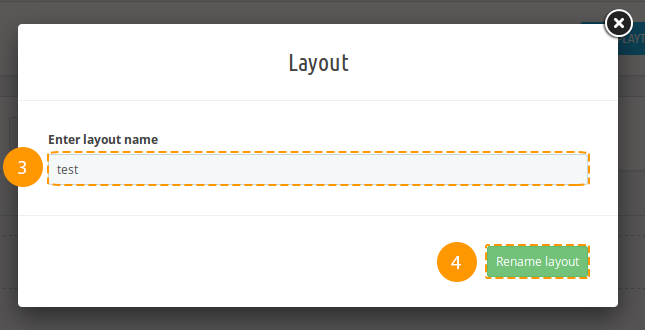
-
Preset was successfully renamed.
Wrapper
Wrapper has no class by default, it's not a mandatory item.
Adding the wrapper
-
In order to create a wrapper, press '+ Add wrapper' (1).

-
Wrapper was added (2).

Adding the custom CSS class to the wrapper
Adding the custom class will let you create a specific styling for your wrapper by using CSS rules.
-
In order to add wrapper class, press the button (1).

-
You'll see a pop-up window, fill in the 'Enter wrapper classes' (2) field there and press a 'Confirm' (3) button.
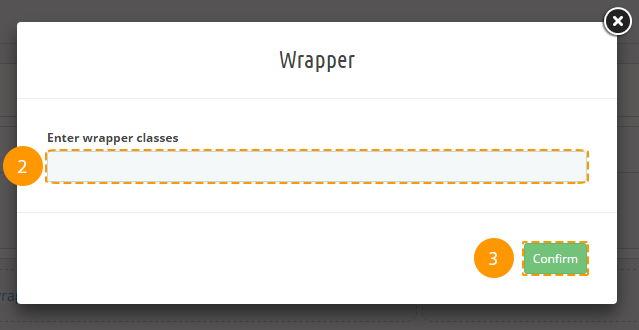
-
Custom class was added successfully.
Deleting the wrapper
Deleting the preset item will also cause all of its child items and their styles removing.
-
In order to remove the wrapper, press the cart button (1).

-
Wrapper was removed successfully.
Styling the wrapper
-
In order to add custom styles to the wrapper, press the 'pencil' (1) icon in the wrapper block.

-
In the following pop-up window fill in all the needed fields (you may refer to the documentation 'Styling' section), and press 'Save' (2) button.
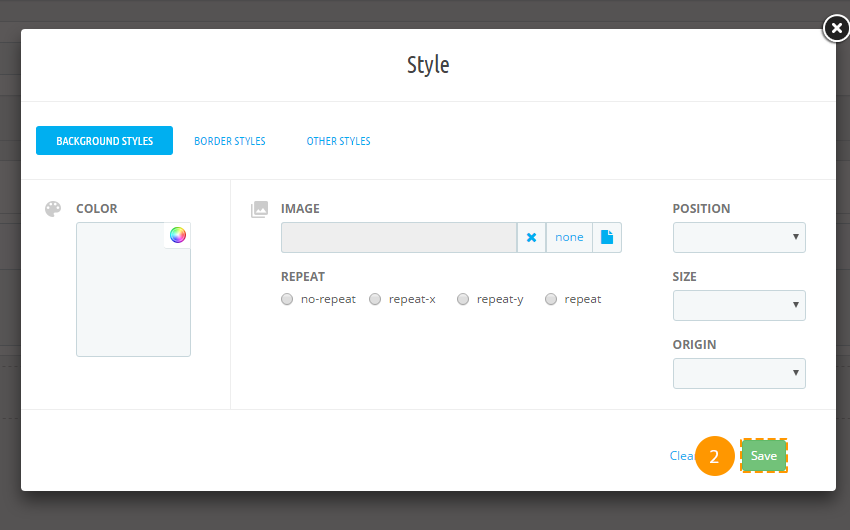
-
If all of the fields are filled in correctly, styles will be saved.
Row
Row item from the Bootstrap grid. It's a required item.
Adding the row
-
In order to insert a new row, press '+ Add row' (1) into the wrapper block, or '+ Add row' (2) in the main preset block, or '+ Add row' (3) in the column dropdown list.

-
The row was added successfully.
Adding custom CSS class to the row
Custom class adding allows you to create custom row styling using CSS rules.
-
In order to add the class to the row, you should press the 'ellipsis' button (1).

-
Choose the 'Edit row' (2) in a dropdown list.

-
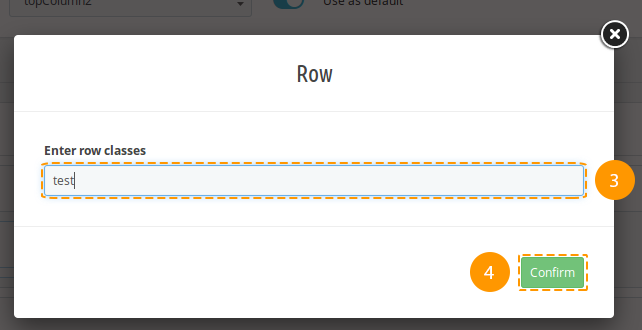
Fill in the 'Enter row classes' (3) field in the pop-up window and press 'Confirm' (4) button.
-
Custom class was added successfully.
Deleting the row
Removal of preset item will also cause removal of its child items and their styles.
-
In order to remove the row, open the menu (the 'ellipsis' icon) in the row block.

-
Choose 'Delete' (2) option in the dropdown.

-
The row was successfully removed.
Adding styles to the row
-
In order to add row styles, open the menu (the 'ellipsis' icon) (1) in a row block.

-
Press 'Stylize' (2) in the dropdown.

-
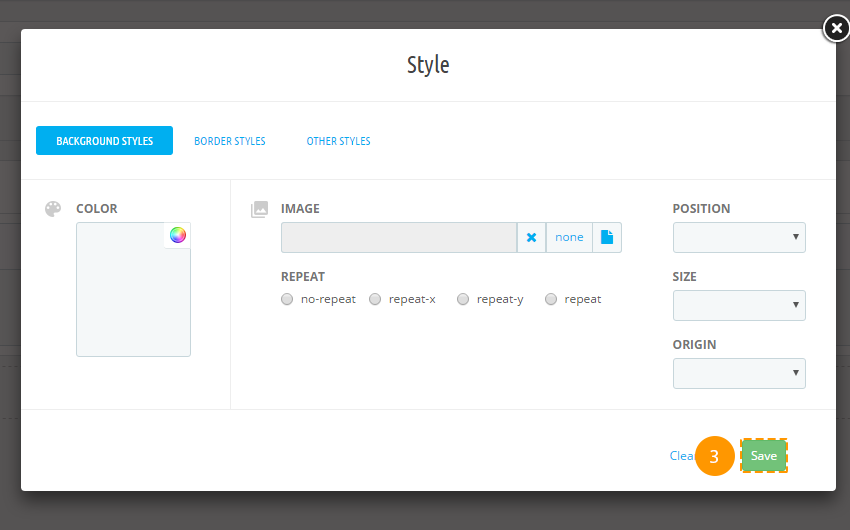
You will see the pop-up window, fill in all the needed fields there (you may refer to the documentation 'Styling' section) and press 'Save' (3) button.
-
If all of the fields are filled in correctly, styles will be saved.
Column
It is an item with configurable block width for different dimensions, based on Bootstrap grid.
Adding the column
-
In order to insert a column into a needed 'row', open the menu (the 'ellipsis' icon) (1)

-
Choose the '+ Add Col' (2) among the list.

-
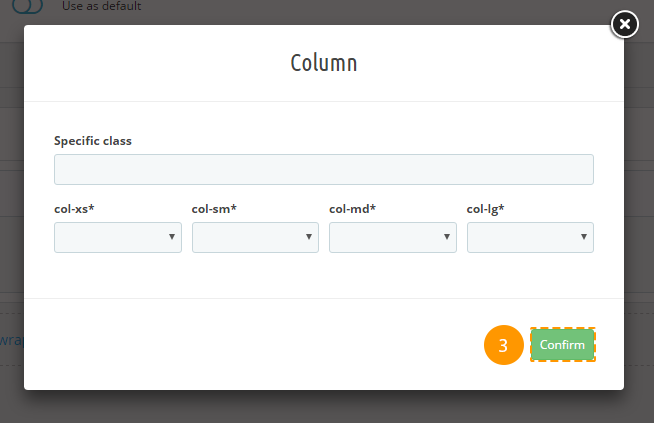
Fill in the fields (col-xs*, col-sm*, col-md*, col-lg - bootstrap classes) in the pop-up window and press 'Confirm' (3) button.
-
The column was added successfully.
Removing the column
Preset item removing will also cause its child items and their styles deleting.
-
In order to remove the column, open the menu (the 'ellipsis' icon) in a column block (1)

-
Press 'Delete' (2) in the list.

-
The column and all of its child items were removed.
Editing the column
-
In order to edit the column, open the menu (the 'ellipsis' icon) (1) in the column block.

-
Press 'Edit column' (2) in the list.

-
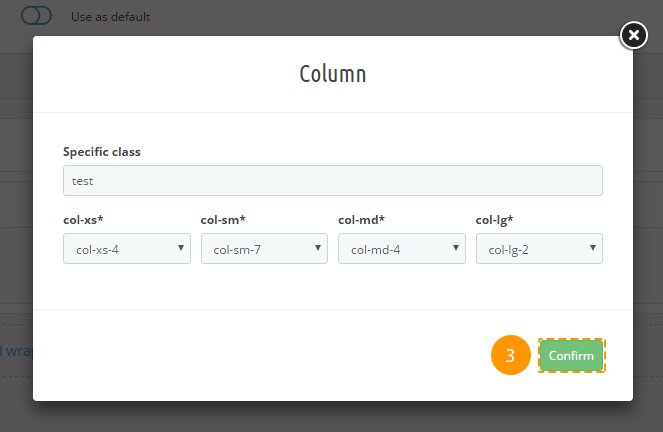
Fill in the fields (col-xs*, col-sm*, col-md*, col-lg - bootstrap classes) in the pop-up window and press 'Confirm'.
-
The column was successfully edited.
Adding styles to the column
-
In order to add column styles, open the menu (the 'ellipsis' icon) (1) in a column block.

-
Press 'Stylize' (2) in the list of options.

-
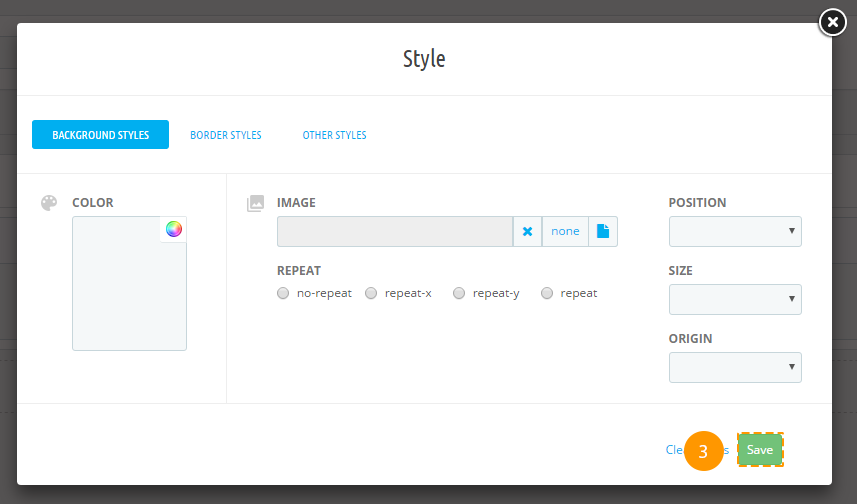
You will see the pop-up window, fill in all the needed fields there (you may refer to the documentation 'Styling' section) and press 'Save' (3) button.
-
If all of the fields are filled in correctly, styles will be saved.
