Worky
Website Customization
Customizer
Customizer is a WYSIWYG theme settings interface. You can setup typography, navigation, widgets positioning, background images, and colors settings here. Our theme installation will provide you with a broader range of settings, such as social networks configuration, page layouts setting, sidebars, block settings, and much more. The main advantage is that you can see the result immediately, and you can change it in no time flat without having to work with the files or code.
There are two ways to start configuring. First is to navigate to Appearance -> Customize section. The second way is to press the Customize link on the top left of the website. This way allows customizing the page you're currently viewing. The first way initially shows the website front page by default.
The left side of the site interface lists the available settings while the page content shows up at the right side of the screen. After adding the changes, you can save them by pressing the Save & Publish button.
Below is the list of settings that can be customized according to your needs:
- Site Identity - logo, site title, tagline, preloader controls;
- General Site Settings - favicon, breadcrumbs, social links, page layout, totop button controls;
- Colors - allows defining the body background color;
- Color Scheme - allows configuring website Color Scheme;
- Typography - font design options for body text, headings, buttons, breadcrumbs, and menu;
- Header - header and top panel styles;
- Background Image - allows defining body background image;
- Menus - allows managing menus and menu items;
- Widgets - allows managing widgets;
- Footer - copyright text and the rest of the footer design options;
- Blog Settings - blog design controls (the settings shows up for the blog page only);
- Homepage Settings - choose what's displayed on the front page of your site;
- Additional CSS - a section for adding your custom CSS rules.
Customizer settings might have no effect in case the content is designed with Elementor.
Managing Blog Layouts
-
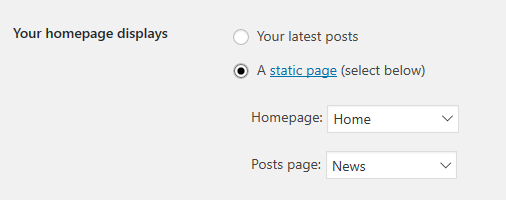
Before editing the blog layouts, make sure that you have the blog page defined at the Settings -> Reading section of your WordPress Dashboard. You should select it in the Posts page dropdown.
-
Next, navigate to the Appearance -> Customizer section of your WordPress Dashboard.
-
Click on your blog page menu item on the right side of the screen.
-
When the page reloads, you will see the new Blog Settings option on the left side, among the rest of the Customizer controls.
It won't show up unless you navigate to the actual blog page on the right!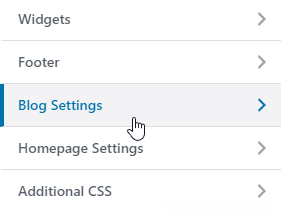
-
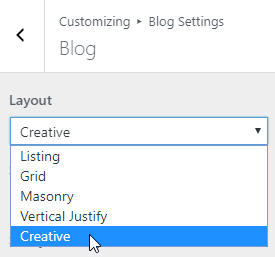
Go to Blog Settings -> Blog. Here you may select a new blog layout in the respective dropdown.
-
Feel free to set the rest of the settings according to your preferences. For example, you may switch the style of your blog, disable the excerpts for your blog posts, etc.
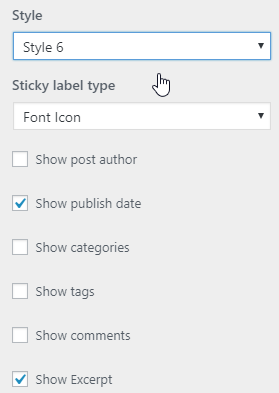
After you've changed everything, press the Publish button at the top.
There is also a quicker way to reach the blog settings. To use it, open your blog page on the website frontend and press the Customize button at the top. The Blog Settings control will load in the settings menu right away.
Widgets
Working with Widgets
Widgets are independent sections of content that can be placed into any widgetized area provided by your theme (commonly called sidebars). To populate your sidebars/widget areas with individual widgets, drag and drop the title bars into the desired area. By default, only the first widget area is expanded. To populate additional widget areas, click on their title bars to expand them.
The Available Widgets section contains all the widgets you can choose from. Once you drag a widget into a sidebar, it will open to allow you to configure its settings. When you are happy with the widget settings, click the Save button, and the widget will go live on your site. If you click Delete, it will remove the widget.
If you want to remove the widget but save its setting for possible future use, drag it into the Inactive Widgets area. You can add them back anytime from there. This is especially helpful when you switch to a theme with fewer or different widget areas.
Widgets may be used multiple times. You can give each widget a title, to display on your site, but it's not required.
Built-in Widgets
There are default WordPress widgets and the ones, added by your theme. All of them are available for use at the Appearance -> Widgets section of your WordPress Dashboard.

The built-in WordPress widgets are:
- Archives
- Audio
- Calendar
- Categories
- Custom HTML
- Custom Menu
- Gallery
- Image
- Meta
- Pages
- Recent Comments
- Recent Posts
- RSS
- Search
- Tag Cloud
- Text
Please, refer to the official WordPress documentation on working with widgets to see the detailed description of each one.
Posts, Categories and Post Formats
WordPress content is stored as posts and categories. This section will show you some basics on working with WordPress posts.
Creating a Blog Post
To add a blog post, you need to do the following:
- Open the Posts tab.
- Click Add New.
- Add content to the post.
You can check detailed information about adding posts at the Posts Screen page of WordPress Codex.
Adding a Category
To add a category, you need to do the following:
- Open the Posts tab.
- Click Categories to see all categories.
- Enter new category name.
- Click Add New Category.
- Click Publish.
You can check detailed information about adding categories at the Posts Categories Screen page of WordPress Codex.
Post Formats
Post formats are used to customize the available post options and markup. You can choose a post format on the post editing screen.
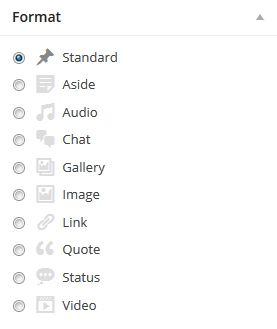
You can check detailed information on post formats on Post Formats page of WordPress Codex.
Working with CSS
What is CSS used for?
CSS code is a statement that tells browsers how to render particular elements on an HTML page. In other words, a CSS rule defines the styling of a certain element on a page. It is a single section of CSS including the selector, the curly braces, and the different lines with properties and values. For example:
h1 { color: #000; font-size: 20px; }
You may want to implement some custom CSS styles to your site to make some element/section look the way you need. To do this, you should inspect the existing CSS of your template, copy the required rule, insert it to the Additional CSS section in Customizer, and modify as per your desire.
Using custom CSS rules
-
Open the page and right-click the item you'd like to define styling for. Then, select Inspect option in the dropdown to open inspector tool. You can learn more about using inspector tools on the following pages:
-
At the right side, you'll see the styles, applied to this item in its regular state. You may also choose a pseudo-class by clicking on the :hov at the top of the Styles list to make the style rules with pseudo-classes applied show up.
-
Now you can see the styles, affecting the item in the rest of states, for example, on hover. This will let you define the new color for buttons, change the scaling, etc. Feel free to edit the code changing the property value, e.g., color or background and add the !important statement before the ; symbol at the end of the property line. You may refer to the example below:
The initial rule (it defines the white link color on hover):
.entry-content a:hover { color: #ffffff;}Your new rule (it makes the link change its color to #123456 on hover):
.entry-content a:hover { color: #123456 !important;} -
You can define any CSS property you need this way. When you're done with adjusting the rule parameters, copy this new (changed) rule to the Appearance -> Customize -> Additional CSS tab of your WordPress Dashboard. Feel free to check site after applying the edits. In some cases, you can edit the original code directly, in this case adding the !important statement is not strictly required.
