Worky
Installation
Engine installation
Zemez theme is built as a WordPress theme, so you need to have WordPress engine installed first. If you have not installed it yet, please follow the steps below.

- You can use the Download WordPress button on the main page of the official WordPress website to get the most recent version of the engine.
- Extract files from the downloaded WordPress engine package. Check the following tutorials to unpack the archive:
- WinZip Downloading and Installation;
- Archived Files Extraction;
- Archived Files Extraction for Windows;
- Template Extraction on MAC OS.
- Creating a Database;
- Creating a Database Manually;
- Creating MySQL Database with GoDaddy;
- Creating a Database with SiteGround;
- Creating a Database with JustHost Server;
- Creating a Database with BlueHost Server.
- Open your browser, type in your domain name to the browser address bar (or your domain name/subdirectory) and click Enter.
- The first page of the installation will appear. Click Create a Configuration file.
- Click Let's Go button and fill in the Database Connection Details:
It is recommended to use the default "wp_" database table prefix for the proper sample data installation.
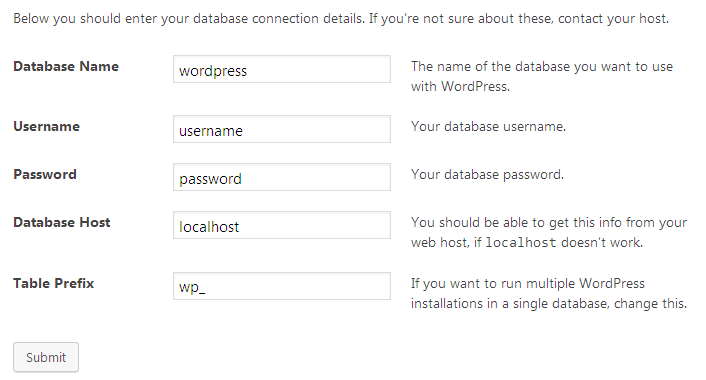
- Fill in the fields with Website Details, as shown below:
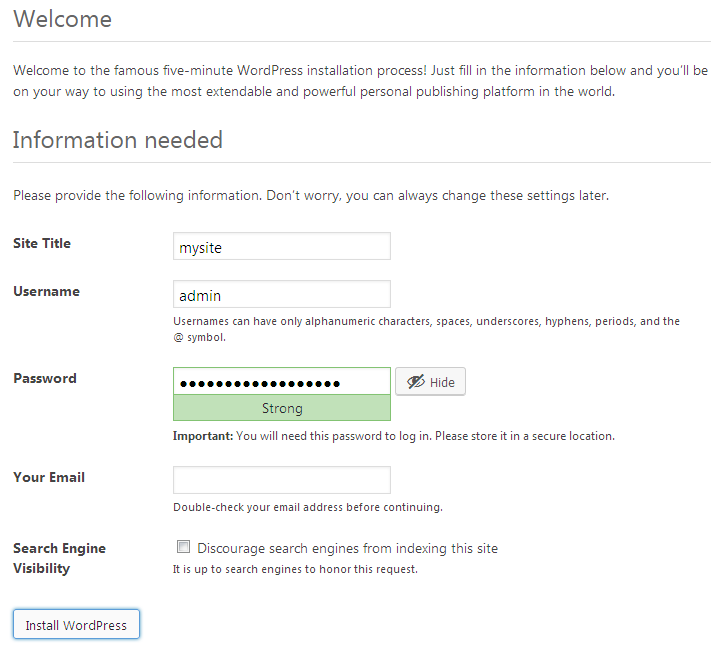
- Click the Install WordPress button.
Step 1. Download WordPress Engine:
Step 2. Upload the extracted files to the hosting server:
Upload WordPress engine files to the root directory on your server. It is usually named www or public_html.
The following tutorials will help you:
Step 3. Create a database for the WordPress platform:
Create a new database in your Hosting Control Panel. You can check the following tutorials and select which way is preferable to you:
Step 4. Installing WordPress:
If you enter the correct details, you will see a successful installation message and the WordPress dashboard access button.
Useful Tips:
Template installation
After installing the engine, you're fully prepared to proceed with the template upload. If you want to recreate the design of the chosen template on your website, you will need to complete all the steps described below. There are three main parts of the installation process - theme upload, plugins installation, and import of the demo data.
Please, note, here and after theme_name stands for your actual theme title.
Uploading theme files
To upload the purchased theme to your website, perform the following steps:
- Extract the template package on your computer and open it.
- Then, go to the /theme/ folder.
- Locate the kava.zip and theme_name.zip archives - you will need to upload them to your website. If there is no kava.zip in your template package, you just need to upload theme_name.zip to your WordPress website.
- Open your WordPress Dashboard and navigate to the Appearance -> Themes menu.
- Press the Add New button and choose the Upload theme option at the top.
- Now, upload the kava.zip archive and activate it. Thus, you will install the parent theme.
- On the next step, upload the theme_name.zip archive (i.e., edem.zip, innomerce.zip) and activate it as well. This one should remain active on site.
- Congrats, theme upload part is finished successfully!
Installing Wizard Plugin
After uploading the theme, your site look remains far from demo one. It's because the functionality of the demo is added with the help of demo content, which is typically installed via the special wizard plugin. So, on the next step, you should install this plugin. Follow the steps below:
- Click on the Begin Installing Plugins link that now appears at the top of a page you're looking at.
- Press the Install link below the Jet Plugin Wizard title.
- Click Return to the Dashboard after the plugin installation.
Now the top of the dashboard displays such a message: 'This wizard will help you to select skin, install plugins, and import demo data for your theme_name theme. To start the install, click the button below!' That means you're ready to install the demo content of your template.
Recommended plugins & Sample data installation
To make your WordPress website appear the same as a live demo of a template, you need to continue with installing its sample data. It will contain all the demo pages, posts, categories, widgets, and settings.
- To begin using the wizard, press the blue Start Install button at the top of your dashboard.
Before the data import, a wizard will check if your server complies with WordPress minimal requirements. It might show you a warning message like 'Not all of your server parameters met requirements. You can continue the installation process, but it will take more time and can probably drive to bugs.'
In case you get such a message, it's better to change the values according to the requirements and re-start the wizard. If all the parameters in a list show up in green with the Ok label, then feel free to press Next.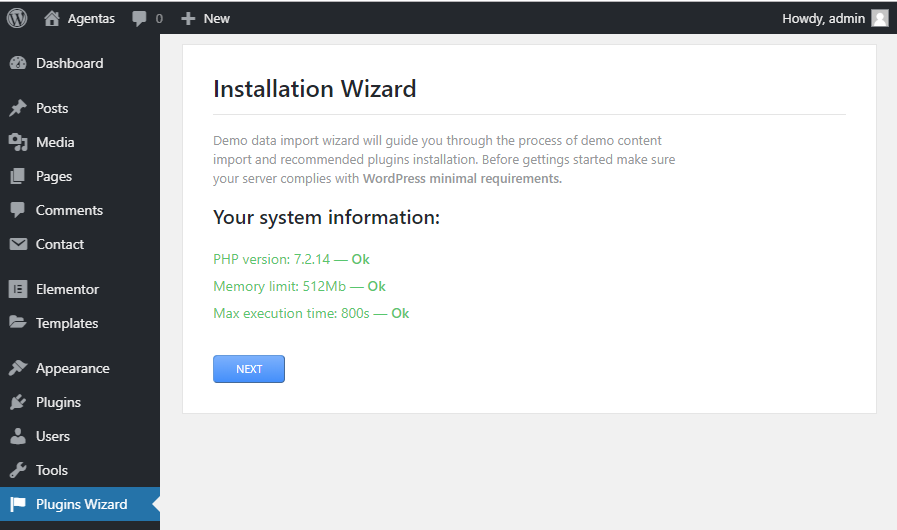
- On the next step, you will see the list of skins, available for your template. A single template might include one, two, or more skins to choose from. You should select the one that is most appealing to you - feel free to preview each one with the help of the View Demo button.
- Once you made up your mind on which skin to use, click on the respective Start Install button below the skin title.
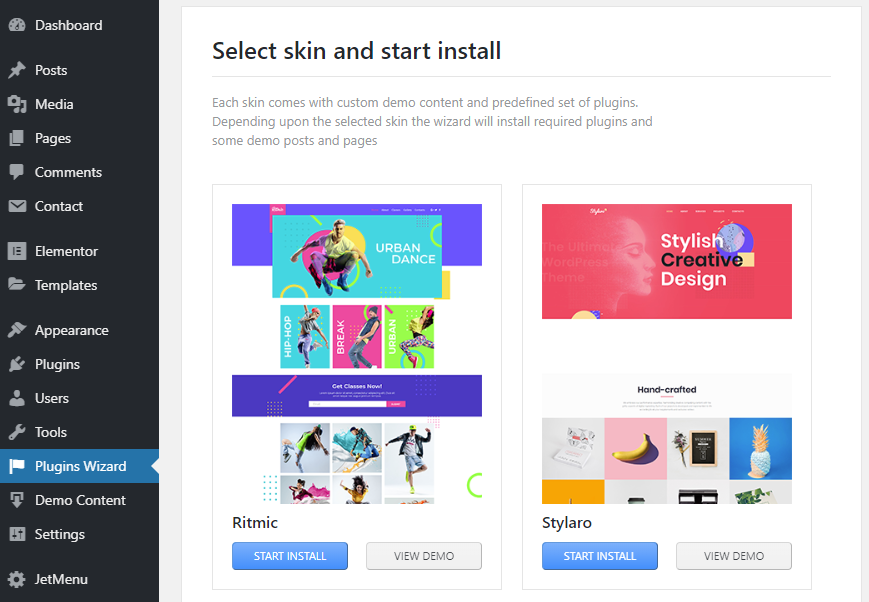
- Wizard will let you decide on which plugins to install with the template. If you intend to get all the demo functionality - keep all the options in the list, and press Next. However, you may also skip to the demo content in case you already have the plugins installed previously.
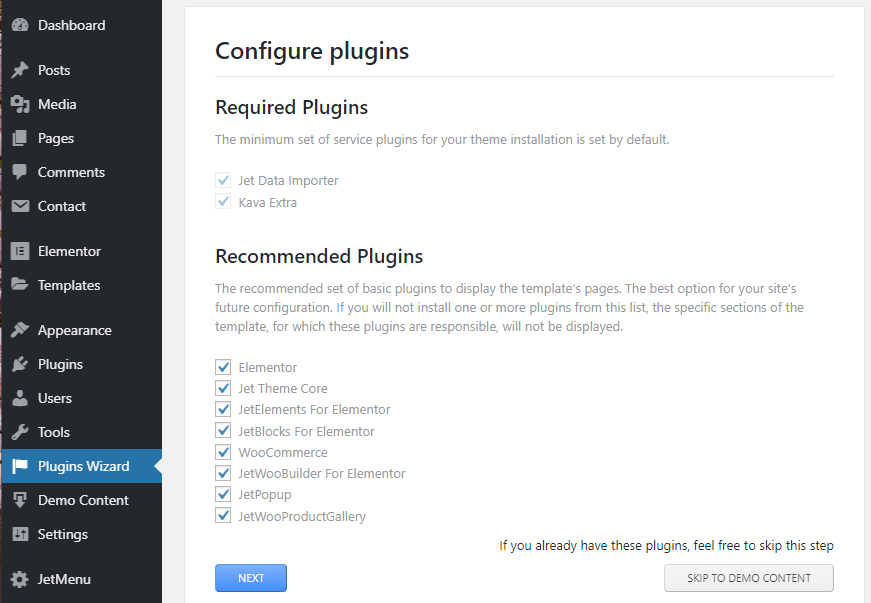
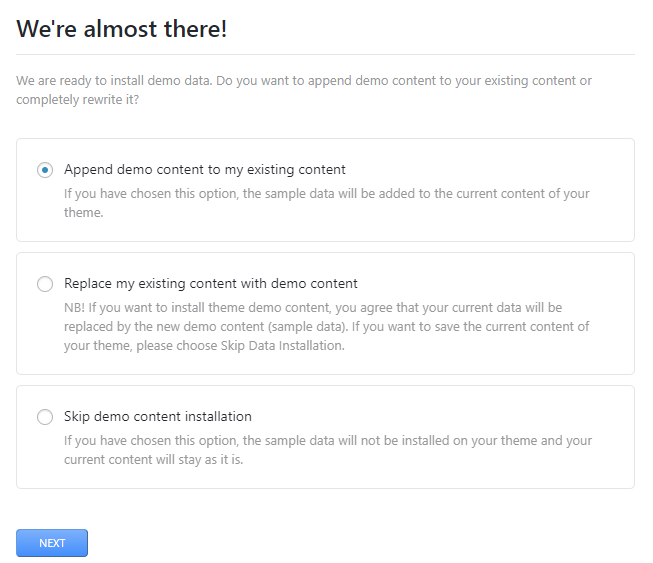
- Please, wait patiently while the wizard installs template plugins to your website. After that, it will prompt to append demo content to your existing site data or completely rewrite it. For most websites, the Append demo content option is the most suitable. In case you decide to override the existing data, you'll need to confirm this decision additionally, by entering your admin password.
- After processing the sample data import, you'll see the 'Congratulations! You’re all Set!' message. Feel free to view your website, start editing the pages or switch to a different skin.
We recommend activating the license key for the Jet Plugins and updating the plugins right after the installation is finished. Your license key is your order ID. It looks like this: XXXXX0tGI7BRJAFXXXX. Go to Crocoblock -> License. Click the “Add New License” button and put your license key (order ID) into the field.

Manual installation
Manual sample data installation
For the manual installation, sample data is provided as an .SQL file. It is located in the theme/manual_install/ folder of the template package and is called theme_name.sql.
The theme_name.sql file can be imported to your site database using the phpMyAdmin tool or some other database management tool in your hosting control panel.
Before you proceed, please, back up your database and make sure your database tables prefix is wp_.
Please, do not use the sample data for your running website! This will replace all of your website content and settings. After an SQL import, your entire content will be completely and irreversibly deleted!
To import the demo content to your website database, please, do the following:
-
Open the template package and go to the /theme/manual_install/ folder.
-
Locate the theme_name.sql file and open it with any text editor that you prefer. The recommended ones are Notepad++, Sublime Text.
-
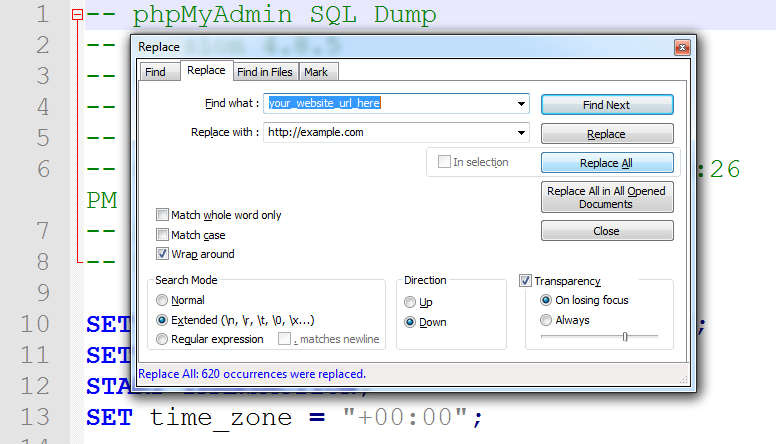
Press Ctrl+H hotkeys to use the Find and Replace tool. Then, replace all the instances of your_website_url_here with your website URL (e.g., https://example.com) in the entire document. Make sure that your website address starts with http and that you do not have the forward slash / symbol at the end of the URL!
-
Save your newly edited file.
-
Open your hosting control panel and look up the PHPMyAdmin tool.

-
Log into the PHPMyAdmin and click on your website database on the left. If you don't know what database to choose, you may check in the wp-config.php file as per this tutorial.
-
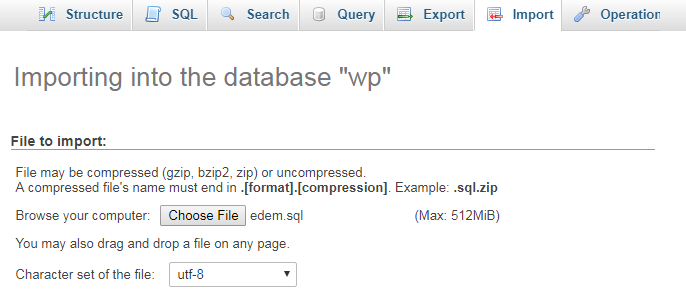
Navigate to the Import tab at the top middle. Check whether you're in the right place - the window title should say 'Importing into the database ...'
-
Browse your computer for the previously edited SQL file using the option below and press the GO button at the bottom to run an import.
-
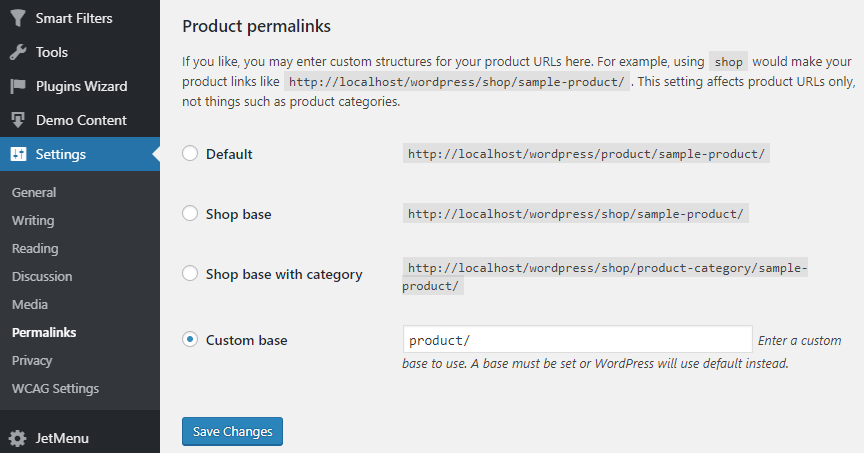
Now, open your WordPress admin panel, navigate to Settings > Permalinks and click the Save Changes button.
-
Sample data is installed successfully!
Congratulations, the demo content is installed. Feel free to check your website now. In case all the steps are done correctly, it should look the same as the Live Demo of a template.
Installation Issues
Even though the template installation is a well-explained process, some typical issues might occur due to this or that. Below we listed the most common ones to help you avoid them:
- Problem #1. Error: Stylesheet is missing
- Problem #2. Warning: Not all of your server parameters met requirements
- Problem #3. Error: Are You Sure You Want to Do This?
- Problem #4. Error: Uploaded file exceeds upload_max_filesize
- Problem #5. Error: Maximum execution time of 30 seconds exceeded
- Problem #6. Issue: Plugins installation freezes
- Problem #7. Warning: Broken Theme (the parent theme is missing)
- Problem #8. Issue: no changes on site after sample data import
- Problem #9. Error: Uncaught Error: Class 'XMLReader' not found in ...
- Problem #10. Error: Internal error, please try again later.
The Stylesheet is missing error can occur when installing a wrong ZIP to your WordPress. Usually, you get this error when you're uploading the full template package or a wizard plugin instead of the theme itself. To avoid this, check the file name of an archive that you upload.
- In case it has 'wizard' in its title (e.g., m2-theme-wizard.zip, jet-wizard.zip) - it's a plugin, upload it to Plugins -> Add new, and not to themes.
- In case it's named like 'template_XXXXX_someletters.zip', where XXXXX is a template number - it's a full template package. You should extract it and open the theme folder to find your actual theme archive inside. Please, refer to Introduction -> Template Structure section of this documentation for more info.
In case you get warning messages like the ones above, it's strongly suggested to change the values according to the requirements.
To correct this issue, you can contact your hosting company and ask them to increase the following values to the provided ones in the server configuration file (php.ini):
- max_execution_time = 300
- max_input_time = 300
- memory_limit = 256M
- post_max_size = 256M
- upload_max_filesize = 128M
Alternatively, you may edit your WordPress configuration file (wp-config.php). Add there the following lines right above the 'That's all, stop editing. Happy blogging!' text:
- ini_set('upload_max_filesize','800M');
- ini_set('post_max_size','800M');
- ini_set('file_uploads','On');
- ini_set('memory_limit','256M');
- ini_set('max_input_time','600');
- ini_set('max_execution_time','600');
- ini_set('safe_mode','off');
- ini_set('max_input_vars','3000');
- define('WP_MEMORY_LIMIT', '256M');
- define('FS_METHOD', 'direct');
This adjustment should help. In case the issue remains, consider abandoning your current hosting company and changing it to a more reliable one.
This issue is usually caused by low upload limit on the server. Please, check 'Problem #2' for a solution.
This issue occurs when the file you're trying to upload exceeds the memory upload limit on the server. Please, check 'Problem #2' for a solution.
This issue occurs when the process you're trying to perform takes too much time and exceeds server limits. This causes the timeout. Please, check 'Problem #2' for a solution.
This issue occurs due to the same reason as most of the typical WordPress problems - it's either the timeout or memory upload limit on the server. Please, check 'Problem #2' for a solution.
In case you're installing the plugins via the wizard, you may 'hack' the system by re-loading the page - plugins installation will resume then. However, it's strongly suggested to increase the server limits as described in a proper solution. It will prevent further issues from happening on a live website.
WordPress is an extremely flexible CMS that allows applying custom edits on all levels - including the source code modifications. To simplify this process, WordPress uses parent+child themes system. The parent theme is a base, and the child one allows changing small aspects of the website appearance yet still preserve the parent theme's look and functionality.
In some cases, your newly uploaded theme might show up as 'broken' at the bottom of the Appearance -> Themes page. This theme itself is alright, but as it's a child one, it can't load correctly unless its parent theme is on the same website. The description of the issue will give you a hint on what exact parent theme to install (for example, it might say 'Please install the "kava" parent theme.').
Experienced users might prefer the direct way of the sample data import, right to the database. However, it sometimes happens that after the successful SQL file import, your website frontend remains unchanged.
In case this issue occurs, most likely, the database prefix of your installation differs from the required one, which is 'wp_'. You may double-check it in the WordPress configuration file (wp-config.php), on a line that says '$table_prefix' (e.g., $table_prefix = 'wp_abc_'; has an incorrect prefix value). Feel free to refer to this guide to eliminate such a problem.
This issue does not depend on a template but the hosting server configuration. Therefore, unfortunately, it can't be helped on the theme side. The XMLReader class relies on the libxml PHP extension. To deal with this error, please, contact your server administrator and ask them to enable the lacked extensions for you.
This message might show up during the sample data installation due to various reasons. To tackle this, first of all, check your server's OpenSSL version (for example, at the Elementor -> System info menu in WordPress). The OpenSSL version should be higher than 1.0.1.
If the OpenSSL version meets the requirements, this means, the reason of the issue is that your server refuses connection to the sample data servers. To overcome this, perform three simple steps:
- Download the following plugin
- Install it to WordPress via Plugins -> Add new -> Upload.
- Copy the following line and add it to your wp-config.php file. Please, paste it right above the text that says 'That's all, stop editing. Happy blogging!':
define( 'JET_PROXY_TO', 'https://monstroid.zemez.io::monstroid' );
