Parts & Tires Documentation
Magento Theme Installation
If you already have a Magento store and want to apply the theme, follow the instruction below.
Install Theme on Live Store
To install the theme you only need to upload all the theme files (the app folder) to your server and then enable the theme in the admin panel.
You can find the theme requirements on the Theme Live-Demo page.
But to avoid unexpected problems after installation, you should first prepare your Magento. Please strictly follow the steps described in this guide:
- Step 1. Backup Magento files
- Step 2. Disable the cache
- Step 3. Upload the app folder
- Step 4. Unzip the app folder
- Step 5. Run the console
The detailed Magento update guide you will find on the Magento User Guide.
Template Configuration
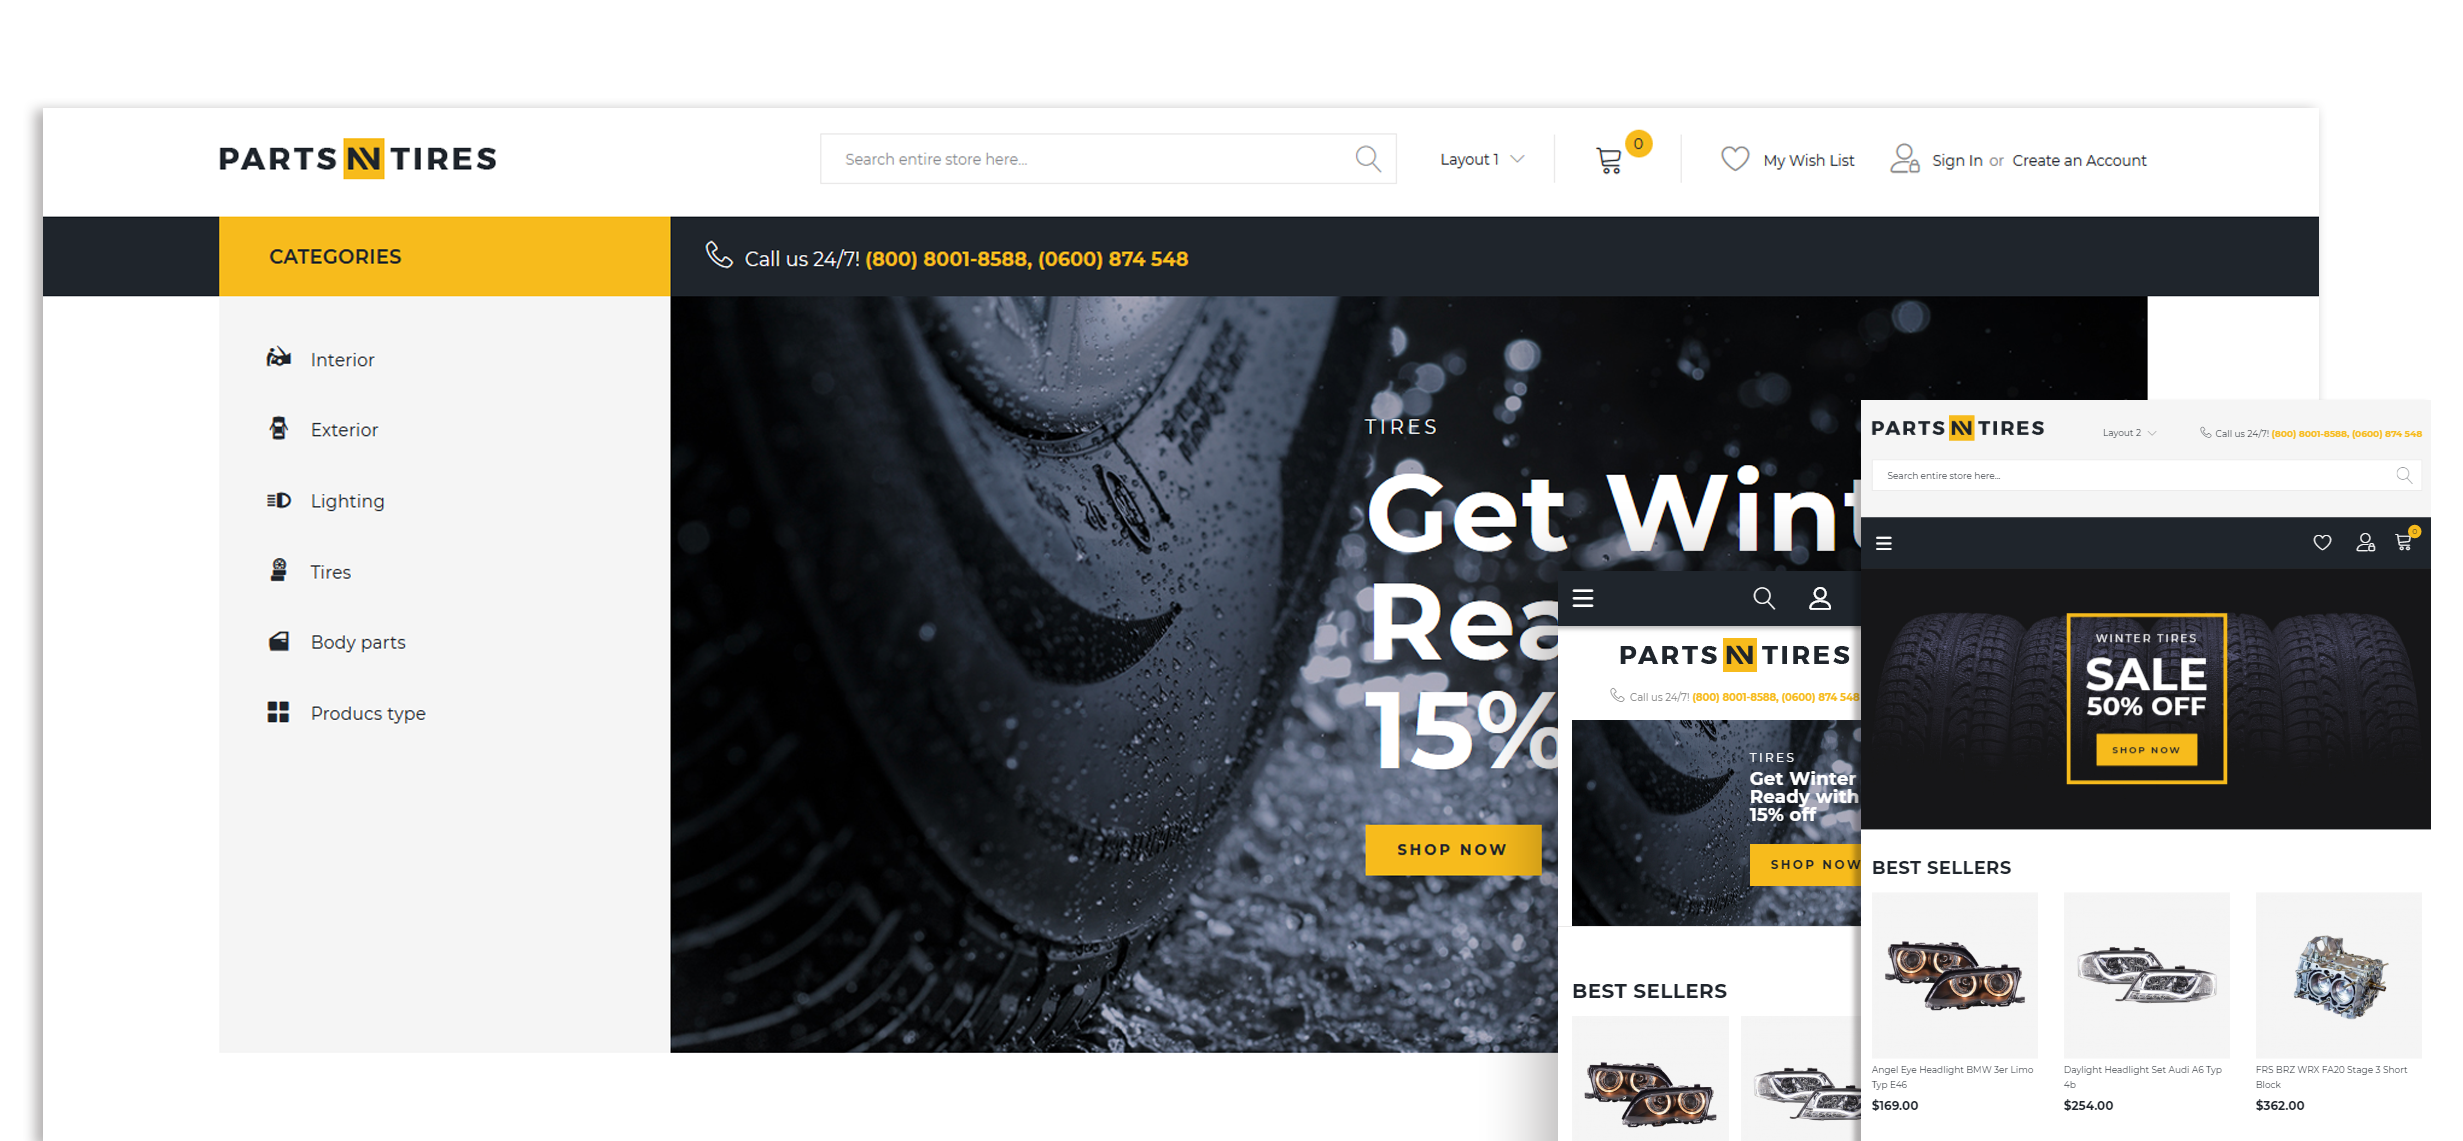
We are going to review template configuration options based on the example. We will configure it the same way as our Live Demo template, without affecting products data.
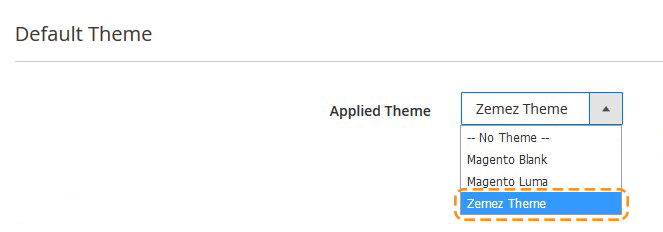
Activate the New Theme
Logo Configuration
Please follow these steps when setting up logo image included into the theme package (you can view it on the Live Demo page).
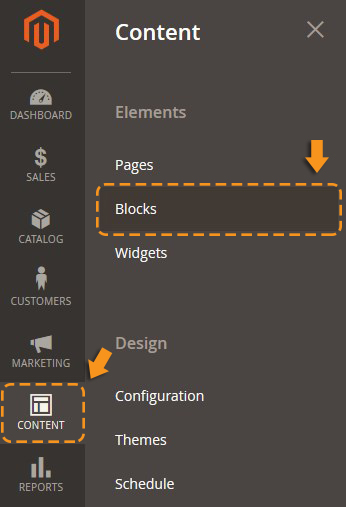
- Open the Magento admin panel and select Content > Configuration in the side menu.

-
In the list of stores you need click edit at Global-Main Website. Also, you can click edit for a particular store view if you have them.
- Select the "Header" tab, and upload your logo.

- Click "Save Config" button.

You can set the Logo via Theme Options extension.
* See the tutorial on How to upload the Logo.
Static Blocks Configuration
When you are done with the pages configuring, you need to configure the static blocks. The procedure is similar: you need to copy the code from the source files and paste it to the corresponding fields in the Magento admin panel. You need to use a similar table but for the static blocks.
Block ID may vary in your Magento installation. You can get correct block id from Content > Blocks section in Admin panel.
- In the top menu navigate to Content > Blocks.
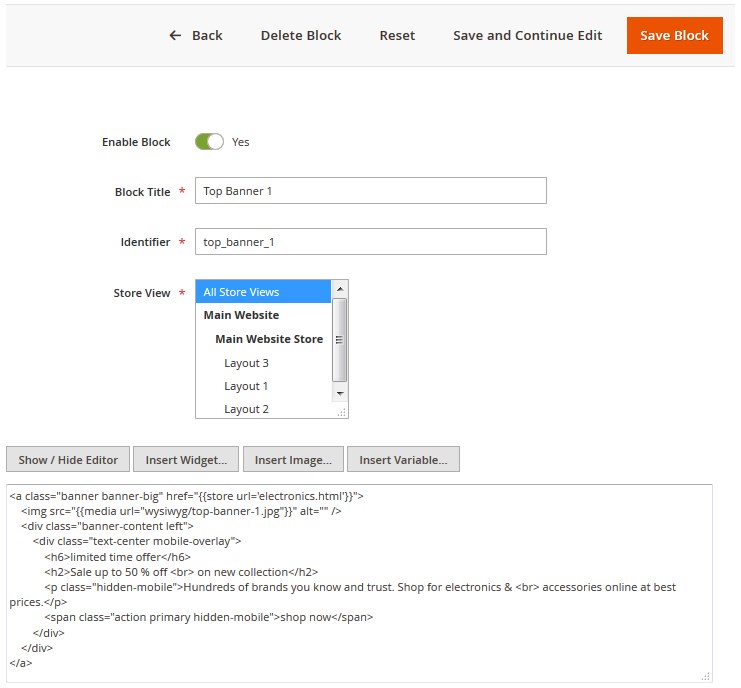
- In the top right corner click the "Add New block" button to add a new static block.
-
Specify the block name and identifier. You can get the block details from the table at the template configuration page (check the Template Settings part).
- Open the block source file and copy the HTML code into the content area.

NOTE: some templates do not contain any static blocks, so the table can be empty.
The source files with the static blocks code are stored in the "sources\demo\static_blocks\" folder of the template package.
For example, to display the banner section (see the Template Settings section) on the Home Page, you should first open the sources\demo\blocks\top_banner_1.phtml file. Copy the file source code.
Then add new CMS Static Block and paste the copied source code in the content area of the block.
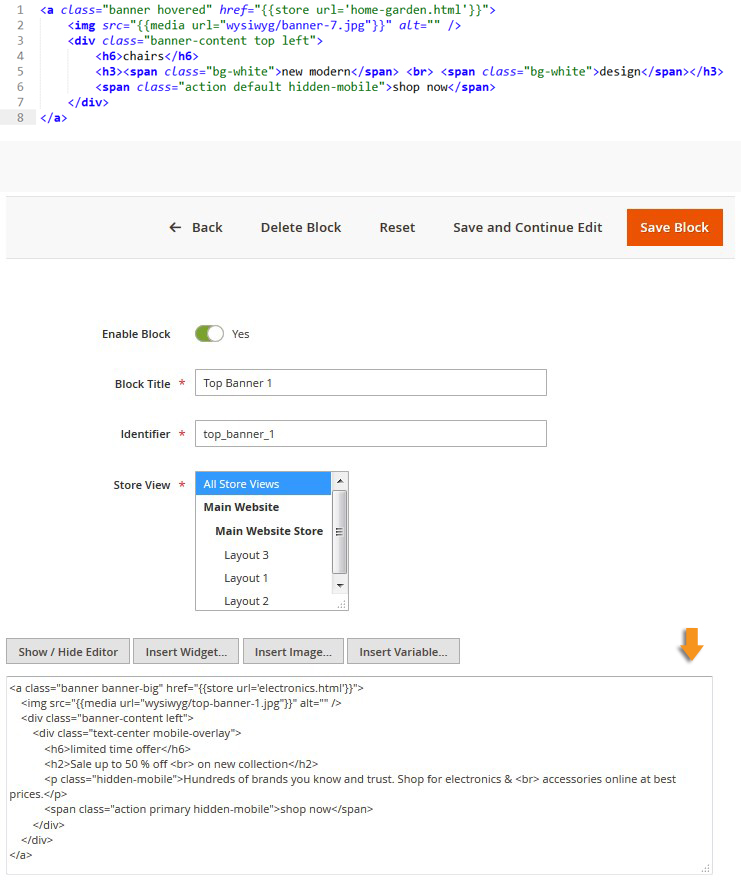
Remember to save the block.
*See the tutorial on How to add CMS Static Block.
After that, you need to add new widget with the same settings you can find in the Template Settings table and select the static block you are referring to in the Widget Options tab.
How to display our blocks with static content?
- In the top menu navigate to Content > Widgets
- In the top right corner click the "Add Widget" button to add a new widget.
- Specify the widget type CMS Static Block and theme that you want to apply the widget to, then click Continue button.
-
On the next page in the Widget Title field enter the name of the widget which will be displayed in the admin panel. In the Assign to Store Views field you need to select store views which will display the widget. In the Layout Updates block click Add Layout Update button. In the Display On field you can select pages where widget will be displayed on. Depending on selected pages you will have opportunity to fill in the additional fields.
- In the left sidebar click Widget Options tab and select the static block you are referring to. Don't forget to save changes.
* Check the tutorial on How to add new Widget to the Page?
When you are done configuring store pages and blocks, your store is ready to go.
Pages Configuration
In order to make your template look exactly like our Live Demo, you need to set up store pages in a specific way. We provide all the files with the pages source code. You need to add them into Magento admin panel as per the instructions below using the settings table. Settings table is located on the Template Settings page on the template preview page or in the Template Settings section.
In case you have already made the changes to your pages code and would like to add our code without affecting your changes, it is recommended to contact professional technicians or prepare a backup before making changes.
-
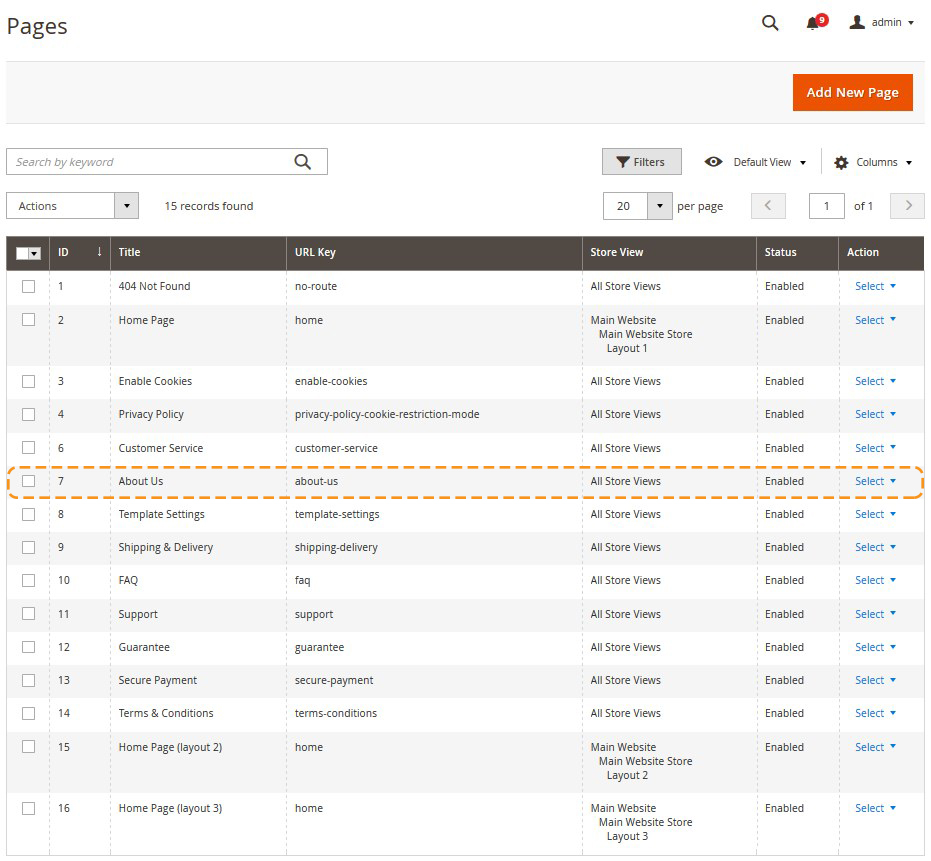
From the top menu select Content > Pages. Here you can find all the store pages. Home page, About Us and Customer Service should already be available, so you don't need to add them. You only need to update the pages HTML and XML content. Open any of them in order to get the access to the content.
-
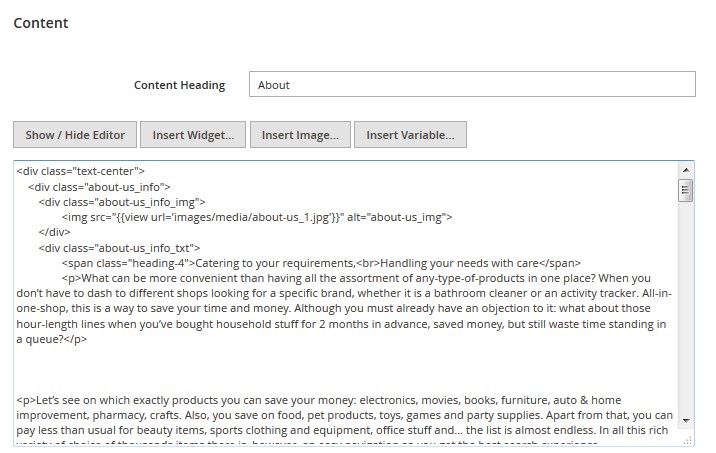
Open the page and select the Content tab. It contains the HTML code of the page. You can take the page HTML code from the appropriate source file. You can see the list of source files included in the "Template Settings" section on your templates preview page. Copy the code from the source file and paste it to the content area.
-
When you are done with the HTML code, switch to "Design" tab. It contains the page XML code. XML code allows you to add Magento static blocks and widgets to the page. The XML code should be copied the same way as the HTML from the source file. Copy the XML code to the "Layout Update XML" area.
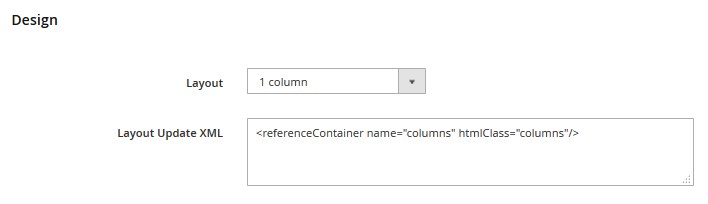
- Don't forget to select the valid "Layout" option.
- In case you need to add a new page, click the "Add New Page" button in the top right corner.
Useful Tutorials:
Template Settings
Configuration of display static blocks/widgets on different layouts shown in the table below.
Pages Configuration
| # | Page Name | Page HTML (Content tab) | Page XML (Design tab) | Layout |
|---|---|---|---|---|
| 1. | 404 Not Found | sources\demo\pages\no-route.phtml | NA | 1 column |
| 2. | Home Page | sources\demo\pages\home.phtml | sources\demo\pages\home.xml | 1 column |
| 3. | Enable Cookies | sources\demo\pages\enable-cookies.phtml | NA | 1 column |
| 4. | Privacy Policy | sources\demo\pages\privacy-policy-cookie-restriction-mode.phtml | NA | 1 column |
| 5. | Customer Service | sources\demo\pages\customer_service.phtml | NA | 1 column |
| 6. | About Us | sources\demo\pages\about_us.phtml | NA | 1 column |
| 7. | Template Settings | sources\demo\pages\template-settings.phtml | NA | 1 column |
| 8. | Shipping & Delivery | sources\demo\pages\shipping-delivery.phtml | NA | 1 column |
| 9. | FAQ | sources\demo\pages\faq.phtml | NA | 1 column |
| 10. | Support | sources\demo\pages\support.phtml | NA | 1 column |
| 11. | Guarantee | sources\demo\pages\guarantee.phtml | NA | 1 column |
| 12. | Secure Payment | sources\demo\pages\secure-payment.phtml | NA | 1 column |
| 13. | Terms & Conditions | sources\demo\pages\terms-conditions.phtml | NA | 1 column |
| 14. | Home Page (layout 2) | sources\demo\pages\home-2.phtml | sources\demo\pages\home-2.xml | 2 columns with right bar |
| 15. | Home Page (layout 3) | sources\demo\pages\home-3.phtml | sources\demo\pages\home-3.xml | 1 column |
Static Blocks Configuration
| # | Block Name | Block Title | Identifier | Content |
|---|---|---|---|---|
| 1. | Header Top Block | Header Top Block | header_top_block | sources\demo\blocks\header_top_block.phtml |
| 2. | Header Info | Header Info | header_info_block | sources\demo\blocks\header_info_block.phtml |
| 3. | Menu Banner | Menu Banner | menu_banner | sources\demo\blocks\menu_banner.phtml |
| 4. | Top Banner 1 | Top Banner 1 | top_banner_1 | sources\demo\blocks\top_banner_1.phtml |
| 5. | Top Banner 2 | Top Banner 2 | top_banner_2 | sources\demo\blocks\top_banner_2.phtml |
| 6. | Top Banner 3 | Top Banner 3 | top_banner_3 | sources\demo\blocks\top_banner_3.phtml |
| 7. | Home Banners 1 | Home Banners 1 | home_banners_1 | sources\demo\blocks\home_banners_1.phtml |
| 8. | Home Banners 2 | Home Banners 2 | home_banners_2 | sources\demo\blocks\home_banners_2.phtml |
| 9. | Home Banners 3 | Home Banners 3 | home_banners_3 | sources\demo\blocks\home_banners_3.phtml |
| 10. | Home Banners 4 | Home Banners 4 | home_banners_4 | sources\demo\blocks\home_banners_4.phtml |
| 11. | Banner 1 | Banner 1 | banner_1 | sources\demo\blocks\banner_1.phtml |
| 12. | Banner 2 | Banner 2 | banner_2 | sources\demo\blocks\banner_2.phtml |
| 13. | Banner 3 | Banner 3 | banner_3 | sources\demo\blocks\banner_3.phtml |
| 14. | Sidebar Banners | Sidebar Banners | sidebar_banners | sources\demo\blocks\sidebar_banners.phtml |
| 15. | Categories List | Categories List | categories_list | sources\demo\blocks\categories_list.phtml |
| 16. | Footer Column 1 Title | Footer Column 1 Title | footer_col_1_title | sources\demo\blocks\footer_col_1_title.phtml |
| 17. | Footer Column Content 1 | Footer Column Content 1 | footer_col_1 | sources\demo\blocks\footer_col_1.phtml |
| 18. | Footer Column Content 2 | Footer Column Content 2 | footer_col_2 | sources\demo\blocks\footer_col_2.phtml |
| 19. | Footer Column Content 3 | Footer Column Content 3 | footer_col_3 | sources\demo\blocks\footer_col_3.phtml |
| 20. | Footer Column Content 4 | Footer Column Content 4 | footer_col_4 | sources\demo\blocks\footer_col_4.phtml |
| 21. | Contact Us Info | Contact Us Info | contact_us_info | sources\demo\blocks\contact_us_info.phtml |
Widgets Configuration
| # | Widget Name | Widget Type | Block Reference | Template / (Static Blocks) | Sort Order |
|---|---|---|---|---|---|
| 1. | Top Banner 1 Layout 1 | CMS Static Block | Main Content Area | Top Banner 1 CMS Static Block | 0 |
| 2. | Top Banner 2 Layout 2 | CMS Static Block | After Page Header | Top Banner 2 CMS Static Block | 0 |
| 3. | Top Banner 3 Layout 3 | CMS Static Block | Page Header Additional | Top Banner 3 CMS Static Block | 0 |
| 4. | Products List 1 Layout 1 | Catalog Products List | Main Content Area | Products Grid | 1 |
| 5. | Home Banners 1 Layout 1 | CMS Static Block | Main Content Area | Home Banners 1 CMS Static Block | 2 |
| 6. | New Products Layout 1 | Catalog New Products List | Main Content Area | New Products Grid | 3 |
| 7. | Home Banners 2 Layout 1 | CMS Static Block | Main Content Area | Home Banners 2 CMS Static Block | 4 |
| 8. | Products List 2 Layout 1 | Catalog Products List | Main Content Area | Products Grid | 5 |
| 9. | Home Banners 3 Layout 1 | CMS Static Block | Main Content Area | Home Banners 3 CMS Static Block | 6 |
| 10. | Bottom Products 1 Layout 1 | Catalog Products List | Main Content Bottom | Products Grid | 0 |
| 11. | Bottom Products 2 Layout 1 | Catalog Products List | Main Content Bottom | Products Grid | 1 |
| 12. | Bottom Products 3 Layout 1 | Catalog Products List | Main Content Bottom | Products Grid | 2 |
| 13. | Products List 3 Layout 2 Layout 3 | Catalog Products List | Main Content Area | Products Grid | 0 |
| 14. | Products List 4 Layout 2 | Catalog Products List | Main Content Area | Products Grid | 1 |
| 15. | Home Banner 1 Layout 2 | CMS Static Block | Main Content Area | Banner 1 CMS Static Block | 2 |
| 16. | Products List 5 Layout 2 Layout 3 | Catalog Products List | Main Content Area | Products Grid | 3 |
| 17. | Home Banner 2 Layout 2 | CMS Static Block | Main Content Area | Banner 2 CMS Static Block | 4 |
| 18. | Products List 6 Layout 2 Layout 3 | Catalog Products List | Main Content Area | Products Grid | 6 |
| 19. | Sidebar Banners Layout 2 | CMS Static Block | Sidebar Main | Sidebar Banners CMS Static Block | 0 |
| 20. | Home Banner 3 Layout 3 | CMS Static Block | Main Content Area | Banner 3 CMS Static Block | 1 |
| 21. | Categories List Layout 3 | CMS Static Block | Main Content Area | Categories List CMS Static Block | 2 |
| 22. | Home Banners 4 Layout 3 | CMS Static Block | Main Content Area | Home Banners 4 CMS Static Block | 5 |